Analyze Audio from Zoom Calls with AssemblyAI and Node.js
Learn how to analyze audio from Zoom calls using AssemblyAI and Node.js.


Including AI in virtual meetings can significantly enhance efficiency and the user experience, a trend confirmed by a recent insights report which found that AI has firmly made its home in end-user products. For example, AI speech services can provide and analyze transcriptions to provide various insights from the meeting, such as an actionable item list or a detailed summary.
In this tutorial, you'll learn how to get and parse audio from a Zoom call, transcribe the audio using AssemblyAI, and then process and analyze the transcribed audio using AssemblyAI's LLM Gateway and Speech Understanding models.
Overview of Zoom audio transcription options
Zoom offers three audio transcription options: built-in cloud transcription (limited accuracy), saved recording transcription via API, and real-time streaming transcription via RTMP. For production applications requiring high accuracy and advanced features, external Voice AI APIs like AssemblyAI provide superior results, a fact underscored in a survey of tech leaders where 58% cited quality and performance and 47% cited accuracy as top factors for choosing a vendor.
This tutorial covers two developer-focused methods: transcribing saved recordings and real-time audio streaming.
Transcribing saved recordings: The most straightforward approach. You'll learn to take a local or cloud recording from Zoom and transcribe it with a simple API call.
Capturing and transcribing live audio: A more advanced method that involves streaming a live Zoom call via RTMP to a custom server, saving the audio, and then transcribing the saved file. This is useful for post-call analysis without relying on Zoom's cloud recordings.
True real-time transcription: For applications requiring immediate, low-latency transcription (like live captioning), AssemblyAI's real-time streaming API is the recommended solution. This tutorial focuses on the RTMP capture method for post-call processing.
We'll start with the simplest method—transcribing a saved recording.
Set up your development environment
Set up your development environment with these commands:
mkdir assemblyai-zoom && cd assemblyai-zoom
npm init -y
npm install assemblyai dotenv fluent-ffmpeg node-media-server
Because we'll be using modern ES Module syntax (import/export), open the generated package.json file and add the following line inside the main JSON object:
"type": "module",Package dependencies:
assemblyai: The AssemblyAI Node.js SDK, which simplifies interaction with the AssemblyAI API.dotenv: Dotenv is a Node.js package that loads environmental variables intoprocess.env. You'll need this package to manage your environmental variables.fluent-ffmpeg: This is a Node.js library that abstracts the complex command line usage of FFmpeg into a simple-to-use package. You'll need this package to process your audio before sending it to AssemblyAI.node-media-server: Node Media Server is a Node.js implementation of several media servers, including RTMP. You'll need this package to create your custom streaming server where you receive an RTMP stream.
Get your free AssemblyAI API key
Create a free account to access your API key and start transcribing Zoom recordings with the Node.js SDK.
Next, create a .env file in your project's root directory and add the variable below to it:
ASSEMBLYAI_API_KEY =In the next section, you'll get your AssemblyAI API key and add it to this .env file.
Get your API key
To get your AssemblyAI API key, you need to have an AssemblyAI account; you can sign up for free if you don't have one.
If you already have an AssemblyAI account, go ahead and log in. On your welcome dashboard, you should see your API key on the right side of your screen.
Click the Copy API key button and paste the API key in your .env file as the value of ASSEMBLYAI_API_KEY.
Transcribe Zoom recordings with AssemblyAI
Transcribe saved Zoom recordings using the AssemblyAI Node.js SDK. This method works with both local files and cloud URLs.
Basic implementation:
import client from './assemblyai.js';

const transcribeRecording = async (filePath) => {
  console.log('Submitting file for transcription:', filePath);
  const transcript = await client.transcripts.transcribe({ audio: filePath });

  if (transcript.status === 'error') {
    console.error('Transcription failed:', transcript.error);
    return;
  }

  console.log('Transcript:', transcript.text);
  return transcript;
};

transcribeRecording('./path/to/your/zoom_meeting.mp4');
This approach is simple, reliable, and perfect for batch processing multiple recordings. For use cases that require immediate transcription, you'll need to handle live audio, which we'll cover next.
Get audio from a Zoom call
Live Zoom audio capture requires RTMP streaming to a custom media server. This method enables real-time transcription without saving recordings.
Requirements:
Zoom Pro plan or higher
Custom RTMP server with FFmpeg processing
Enabled livestreaming for meetings
To stream audio from a Zoom call to a custom media server using RTMP, you must have a Pro plan or higher on Zoom. Additionally, you need to enable livestreaming for meetings on your account.
Next, you'll need a custom media server to receive the audio stream from your Zoom call.
Create a custom media server
To create a custom media server, start by making a new src folder in your project's root directory. Then, create a mediaServer.js file in your src folder with the code below:
// mediaServer.js
import NodeMediaServer from 'node-media-server';
import processAudioStream from './audioProcessor.js';

const config = {
  rtmp: {
    port: 1935,
    chunk_size: 60000,
    gop_cache: true,
    ping: 30,
    ping_timeout: 60,
  },
  http: {
    port: 8000,
    allow_origin: "*",
  },
};

const nms = new NodeMediaServer(config);

// Listen for the "prePublish" event to start processing the audio stream
nms.on('prePublish', (id, StreamPath, args) => {
  console.log(`Stream [${id}] is about to be published at path: ${StreamPath}`);
  processAudioStream(StreamPath);
});

nms.run();
This code sets up a Node.js server for a custom streaming service. It starts by importing the NodeMediaServer library and a processAudioStream function (you'll implement this later). Then, it creates a configuration object for your media server.
The config object contains the configuration for your rtmp and http servers.
The configuration for RTMP includes the following:
port: This option represents the port on which the RTMP server listens for traffic.1935is the default port.chunk_size: This option specifies the size of the data chunks that the server sends over the network, and it's measured in bytes. In this configuration, the chunk size is set to 60,000 bytes.gop_cache: Settinggop_cachetotrueenables the server to cache each stream's latest group of pictures (GOP).ping: This option specifies the interval, in seconds, at which the server sends RTMP ping messages to connected clients to keep the connection alive and measure the round-trip time. In this configuration, the server will send a ping every thirty seconds.ping_timeout: This is the timeout (in seconds) for RTMP ping responses. The server closes the connection if the client doesn't respond to a ping message within this time. In this configuration, the timeout is set to sixty seconds.
The configuration for the HTTP server includes the following:
port: This is the port number on which the HTTP server will listen for traffic. In this configuration, the port is set to8000.allow_origin: This setting specifies which origins can make cross-origin requests to the server. The wildcard*is used in this configuration, meaning the server will accept cross-origin requests from any origin.
Explore transcription features in your browser
Upload a Zoom recording to see accuracy, speaker labels, and PII redaction—no code required.
After setting up the configuration object, it creates an instance of NodeMediaServer and listens for the prePublish event. On the prePublish event, it calls the processAudioStream function and passes StreamPath as an argument.
You've now set up your custom streaming service. In the next step, you'll use FFmpeg to parse the audio from the RTMP stream.
Parse audio from an RTMP stream
RTMP streams typically contain both audio and video data multiplexed together. To use the audio data separately, you need to extract it from the combined stream and store it. For this tutorial, you'll store the extracted audio in an MP3 file.
To ensure that each audio file has a unique name, you can create a utility function that combines the current date (YYYY-MM-DD) and the timestamp to generate unique file names.
Create a utils.js file in your src folder and add the following code to it to implement the logic above:
export function getFormattedDateTime() {
  const now = new Date();
  const year = now.getFullYear();
  const month = String(now.getMonth() + 1).padStart(2, "0");
  const day = String(now.getDate()).padStart(2, "0");
  const timestamp = Date.now();
  return `${year}${month}${day}_${timestamp}`;
}
Next, create an audioProcessor.js file in your src folder and add the code block below to implement the logic for parsing the audio and saving the parsed audio to an MP3 file:
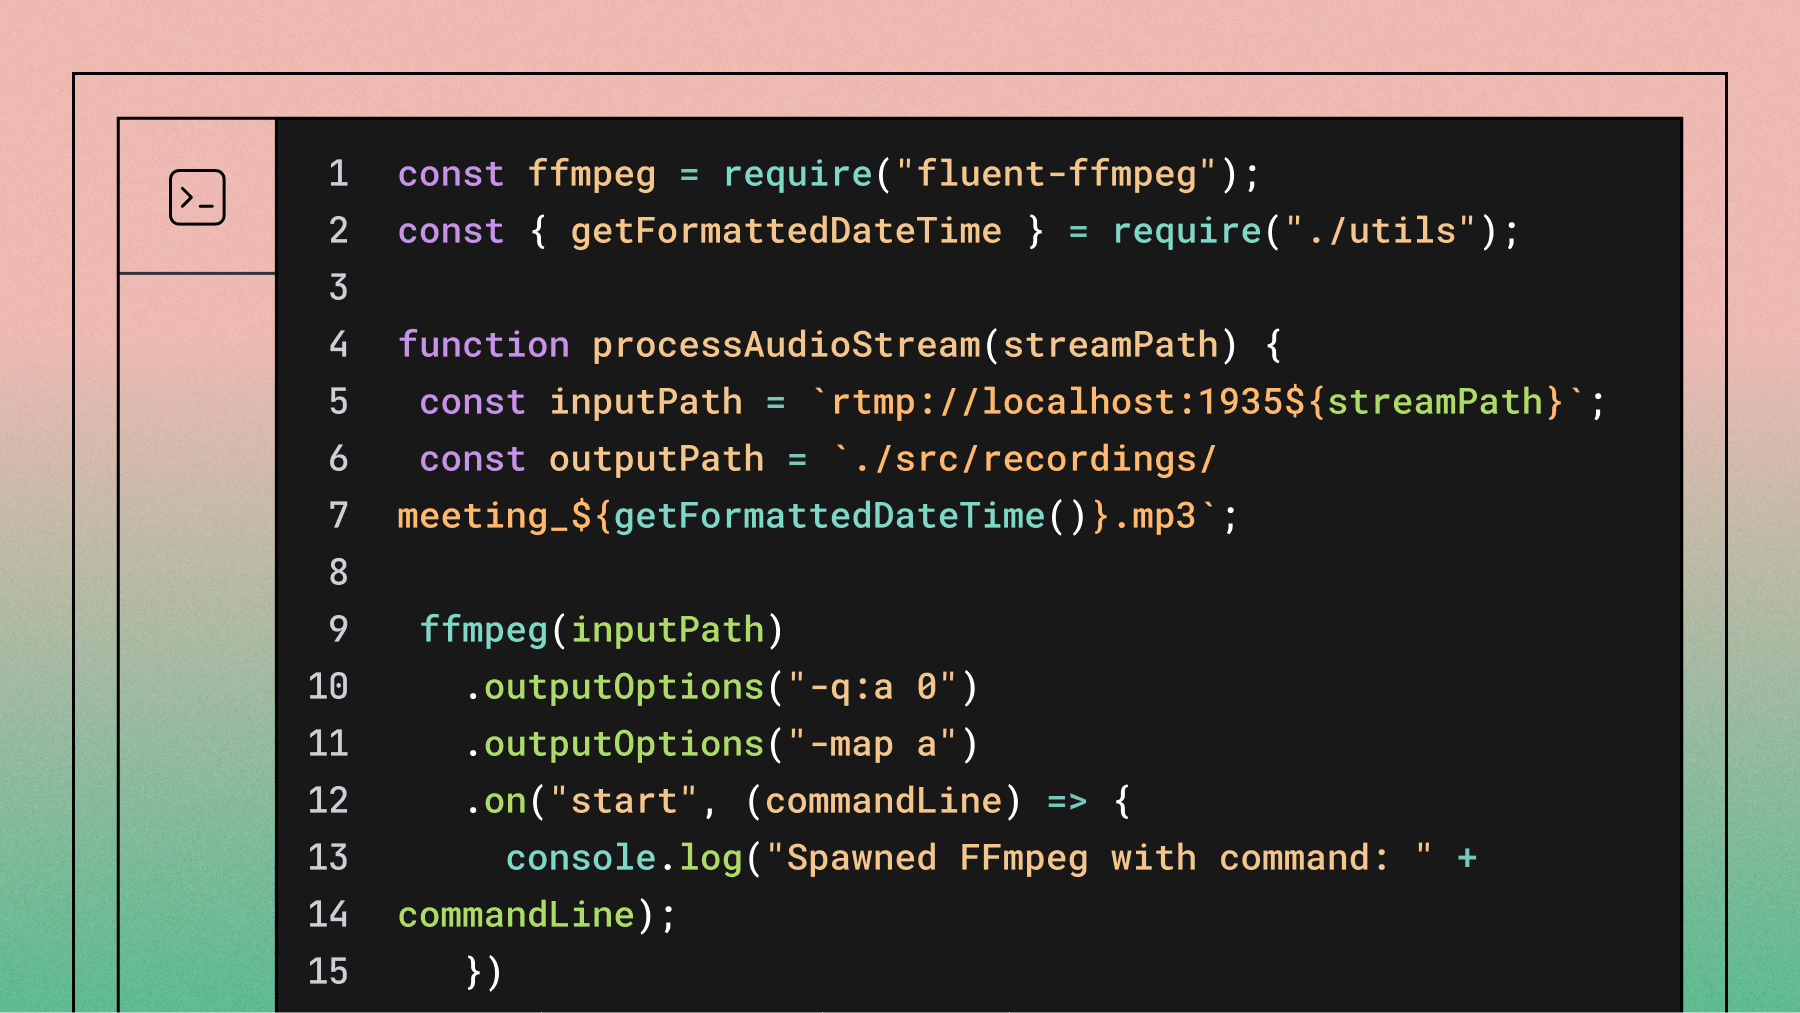
import ffmpeg from 'fluent-ffmpeg';
import { getFormattedDateTime } from './utils.js';

export default function processAudioStream(streamPath) {
  const inputPath = `rtmp://localhost:1935${streamPath}`;
  const outputPath = `./src/recordings/meeting_${getFormattedDateTime()}.mp3`;

  ffmpeg(inputPath)
    .outputOptions('-q:a 0') // Set the audio quality to the highest quality
    .outputOptions('-map a') // Map only the audio streams
    .on('start', (commandLine) => {
      console.log('Spawned FFmpeg with command: ' + commandLine);
    })
    .on('progress', (progress) => {
      console.log('Processing: ' + progress.timemark + '...');
    })
    .on('error', (err, stdout, stderr) => {
      console.log('An error occurred: ' + err.message);
      console.log('FFmpeg stderr: ' + stderr);
    })
    .on('end', () => {
      console.log('Processing finished!');
    })
    .save(outputPath);
}
The code above listens to an RTMP stream, extracts the audio, and saves it as an MP3 file with high quality. It also provides detailed logs for the FFmpeg start, progress, error, and end events.
Finally, start your server by running the command below:
node src/mediaServerWith this setup, once your media server receives an RTMP stream and emits the prePublish event, it will parse the audio from the stream and save it to an MP3 file.
Start transcribing Zoom audio with AssemblyAI
Now that your server saves MP3 files, create a free account to get an API key and transcribe recordings programmatically.
Make your custom media server accessible with ngrok
Currently, your media server is hosted on localhost. You need to make it accessible to Zoom using ngrok.
To continue, you need to install ngrok and set it up on your operating system. Then, run the command below to get the location of your ngrok configuration file:
ngrok config checkcd into the directory returned by the command above, open your ngrok.yml file, and add the configuration below to run your TCP and HTTP ports:
tunnels:
  tcp_tunnel:
    proto: tcp
    addr: 1935
  http_tunnel:
    proto: http
    addr: 8000
You can now run ngrok with the command below:
ngrok start --allYou should see an output similar to the following in your terminal:

Save your forwarding URLs. In the image above, these are tcp://5.tcp.eu.ngrok.io:13156 (this will be your streaming URL) and https://c9f0-105-114-3-2.ngrok-free.app (this will be your livestreaming page URL).
Stream audio to your custom live streaming service
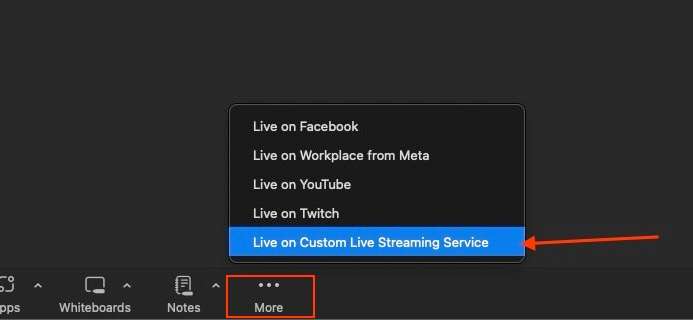
In an ongoing Zoom call, click the three dots on the bottom right of your screen and select Live on Custom Live Streaming Service:
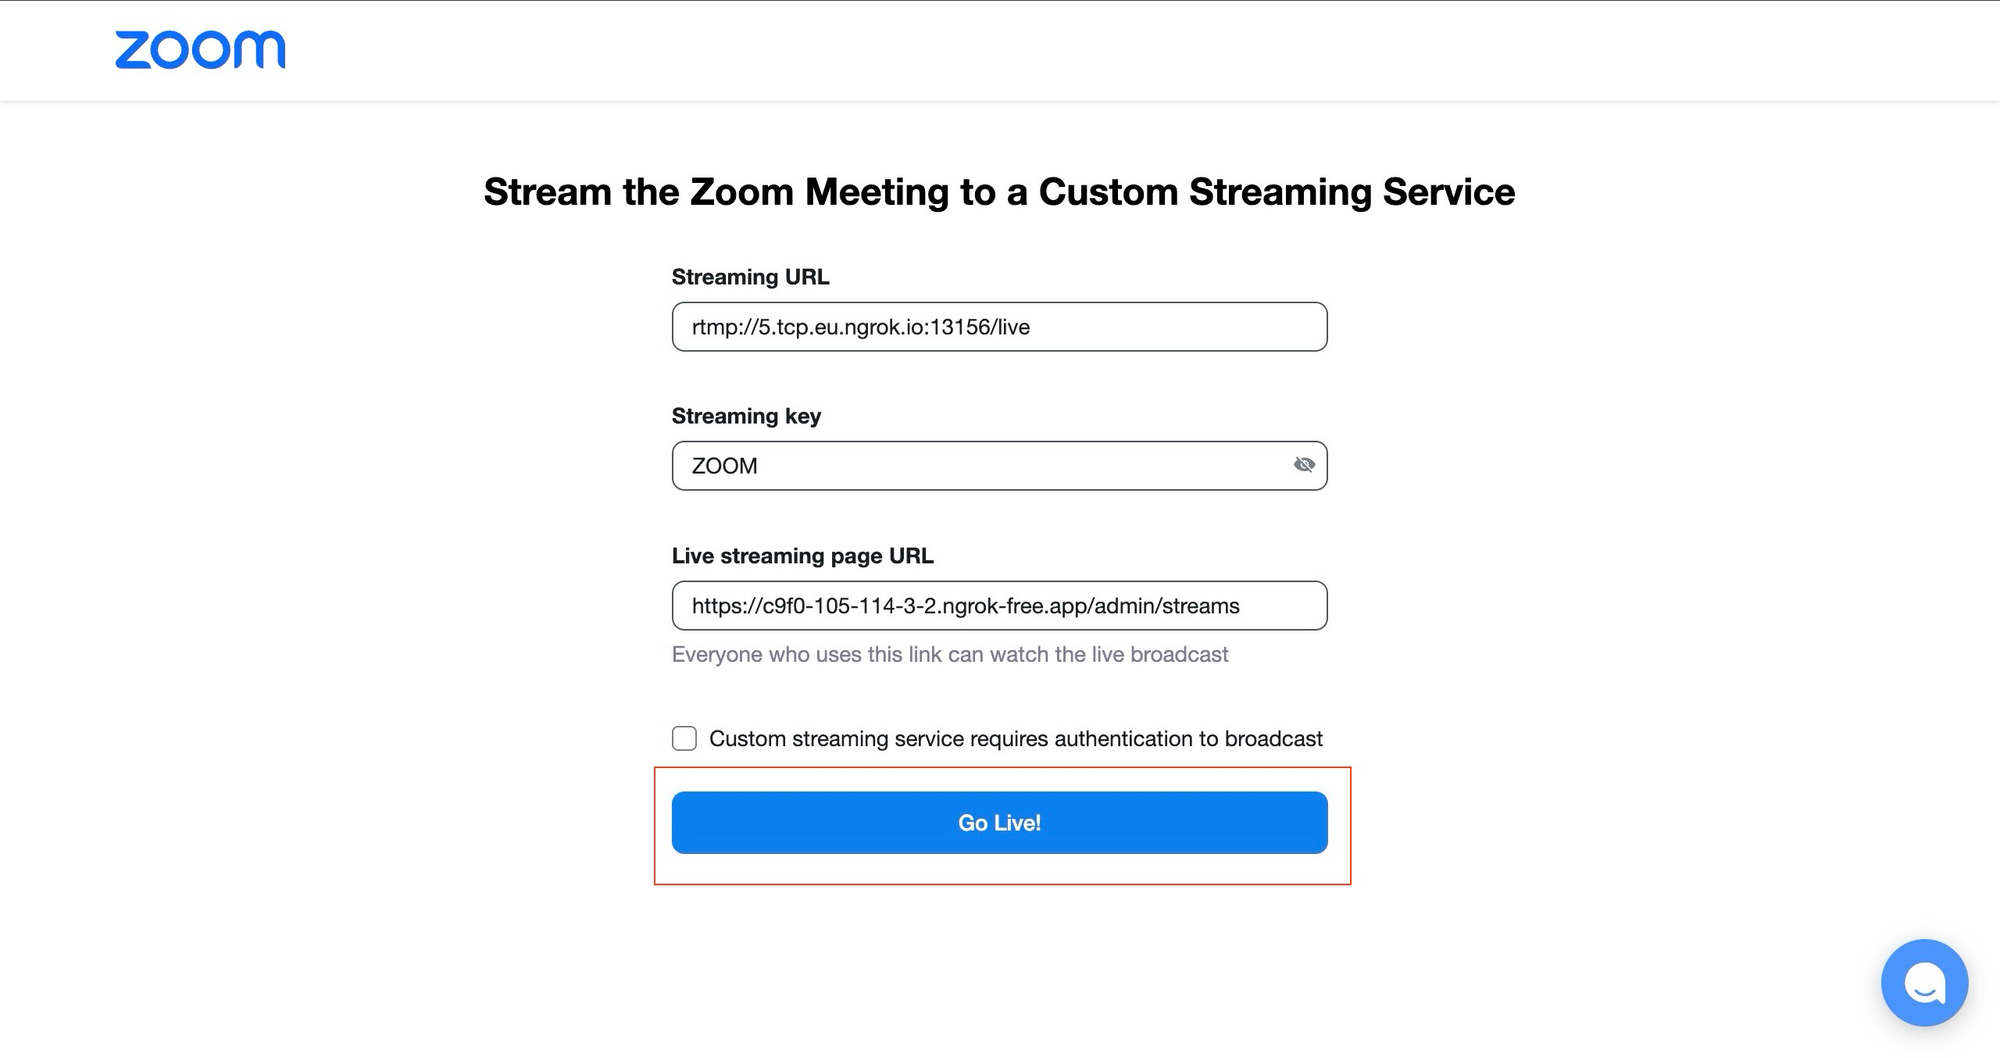
You'll be presented with a form to fill in your livestreaming server's information.
The fields in the form include:
Streaming URL: The base URL where your stream should be transmitted, which is the forwarding URL for your RTMP server you saved earlier. Change the protocol in the URL from
tcptortmp. Then, append/liveto the end of the URL to specify the route where the stream is directed—for example,rtmp://5.tcp.eu.ngrok.io:13156/live.Streaming key: A unique identifier the streaming server uses to recognize and manage incoming streams. It acts as a password or token that authorizes the stream being sent to the server. You can fill the streaming key with any value of your choice, such as
ZOOM.Live streaming page URL: The URL where you can view your stream. In this case, it's your HTTP forwarding URL with the route
/admin/streamsappended to it—for example,https://c9f0-105-114-3-2.ngrok-free.app/admin/streams.
Fill out the fields with their appropriate values and click the Go Live! button:
This redirects you to your custom streaming server:
https://i.imgur.com/fNjo6ok.jpeg
Your custom streaming service is now recording your Zoom call audio and will save it to an MP3 file once your call ends or you end the livestream.
Transcribe audio with AssemblyAI
Now that you have your Zoom audio, you can get the transcript using AssemblyAI. To achieve this, you need to initialize the AssemblyAI SDK using your API key.
Create an assemblyai.js file and add the code block below to initialize your SDK:
import 'dotenv/config';
import { AssemblyAI } from 'assemblyai';

// Create a new AssemblyAI client
const client = new AssemblyAI({
  apiKey: process.env.ASSEMBLYAI_API_KEY,
});

export default client;
To transcribe a local audio file using AssemblyAI, call the transcribe method on client.transcripts and pass the file path as an argument.
Here's a standalone example:
import client from './assemblyai.js';

const transcribeAudio = async (filePath) => {
  const transcript = await client.transcripts.transcribe({ audio: filePath });

  if (transcript.status === 'error') {
    console.error(`Transcription failed: ${transcript.error}`);
    return;
  }

  console.log(transcript.text);

  return transcript;
};

transcribeAudio('src/recordings/FILE_PATH_TO_AUDIO');
In this code, the transcribeAudio function takes a file path as an argument and returns a transcript. If your audio file is stored on the cloud, you can pass the audio URL as an argument to transcribe it. Running the code will return a full transcript of the audio whose location you passed as an argument.
Analyze audio with AssemblyAI's LLM Gateway
AssemblyAI's LLM Gateway provides a unified interface to apply powerful Large Language Models (LLMs) from providers like Anthropic and Google directly to your audio data. This allows you to perform various tasks on your transcripts, such as asking questions, summarizing content, and generating action items, all through a single, streamlined API.
The following example uses a recorded meeting about the "paradox of poverty." You can use the LLM Gateway to summarize it by passing the transcript text and a prompt to the model.
import client from './assemblyai.js';

const summarizeAudioWithLLMGateway = async (filePath) => {
  // First, transcribe the audio file
  const transcript = await client.transcripts.transcribe({ audio: filePath });

  if (transcript.status === 'error') {
    console.error(`Transcription failed: ${transcript.error}`);
    return;
  }

  // Then, use the transcript text with the LLM Gateway
  const { choices } = await client.chat.completions.create({
    model: 'claude-3-5-sonnet', // Or another suitable model like 'gemini-2.5-pro'
    messages: [
      {
        role: 'user',
        content: `Please provide a summary of the following transcript in bullet points. The context is a talk on the paradox of poverty.\n\nTranscript:\n${transcript.text}`
      }
    ],
    max_tokens: 500,
    temperature: 0.3,
  });

  const summary = choices[0].message.content;
  console.log(summary);
  return summary;
};

summarizeAudioWithLLMGateway('src/recordings/meeting_20240603_1717405934474.mp3');
The code block above will return the summary of the audio file in bullet points.
You can also send any prompt of your choice to the LLM to analyze your transcribed audio. You can send prompts to ask specific questions about your audio data, like "How many times was the word 'poverty' used in the meeting?" or "List the examples of welfare traps."
For example, the code block below demonstrates how you can use a prompt ("What is the main idea of the talk?") to query your audio data to get the main idea of the audio:
import client from './assemblyai.js';

const analyzeAudioWithLLMGateway = async (filePath, prompt) => {
  // First, transcribe the audio file
  const transcript = await client.transcripts.transcribe({ audio: filePath });

  if (transcript.status === 'error') {
    console.error(`Transcription failed: ${transcript.error}`);
    return;
  }

  // Then, use the transcript text with the LLM Gateway
  const { choices } = await client.chat.completions.create({
    model: 'claude-3-5-sonnet',
    messages: [
      {
        role: 'user',
        content: `${prompt}\n\nBased on this transcript:\n${transcript.text}`
      }
    ],
    max_tokens: 500,
    temperature: 0.3,
  });

  const answer = choices[0].message.content;
  console.log(answer);
  return answer;
};

analyzeAudioWithLLMGateway(
  'src/recordings/meeting_20240603_1717405934474.mp3',
  'What is the main idea of the talk?'
);
The code block above will return a response detailing the main idea of the audio passed as an argument.
Speech Understanding and Guardrails
In addition to transcription, AssemblyAI offers a suite of models to extract deeper insights. Speech Understanding models like Sentiment Analysis help interpret the content of the audio. Guardrails, such as PII Redaction and Content Moderation, help ensure your audio data is safe and compliant, addressing what a 2025 market survey identified as a significant challenge for over 30% of tech leaders: data privacy and security.
Let's take an example of PII redaction on your audio transcript to minimize sensitive information about individuals by automatically identifying and removing them. To enable PII redaction, you need to add a few configuration parameters. The following code block is a modified version of the transcribeAudio function with the required parameters:
import client from './assemblyai.js';
import { PIIRedactionPolicy, PIISubstitutionPolicy } from 'assemblyai';

const transcribeAudioWithPIIRedaction = async (filePath) => {
  const transcript = await client.transcripts.transcribe({
    audio: filePath,
    redact_pii: true,
    redact_pii_policies: [
      PIIRedactionPolicy.BankingInformation,
      PIIRedactionPolicy.PhoneNumber,
      PIIRedactionPolicy.EmailAddress,
    ],
    redact_pii_sub: PIISubstitutionPolicy.Hash,
  });

  console.log(transcript.text);

  return transcript;
};

transcribeAudioWithPIIRedaction(
  'src/recordings/meeting_20240603_1717405934474.mp3'
);
The parameters you added here are as follows:
redact_pii: A boolean that enables PII redaction in the transcript when set totrue.redact_pii_policies: An array of policies specifying the information to be redacted. The SDK provides an enum,PIIRedactionPolicy, for type-safe policy selection.redact_pii_sub: Specifies the substitution method for redacted information. The SDK provides an enum,PIISubstitutionPolicy, with options likeHash(replaces with###) orEntityType(replaces with[entity_type]).
The code block will return a transcript with all the specified PII redacted.
You can find the code used in this tutorial in this GitHub repository.
Advanced features for meeting analysis
Extract structured insights from transcripts using AssemblyAI's audio intelligence models:
Speaker diarization
To understand who said what, you can enable speaker diarization. This feature identifies and labels each speaker in the conversation. Just add the speaker_labels parameter to your transcription request.
const transcript = await client.transcripts.transcribe({
  audio: filePath,
  speaker_labels: true,
});

if (transcript.utterances) {
  // Log each utterance with its speaker
  for (const utterance of transcript.utterances) {
    console.log(`Speaker ${utterance.speaker}: ${utterance.text}`);
  }
}
Automated meeting summaries
Instead of reading a full transcript, you can generate a concise summary using the LLM Gateway. After transcribing the audio, you send the transcript text to the Gateway with a prompt requesting a summary in your desired format, like a paragraph or bullet points.
const { choices } = await client.chat.completions.create({
  model: 'claude-3-5-sonnet',
  messages: [{
    role: 'user',
    content: `Summarize the following meeting transcript in bullet points.\n\nTranscript:\n${transcript.text}`
  }],
  max_tokens: 500,
});

console.log('Meeting Summary:', choices[0].message.content);
Action item detection
Automatically identify action items and follow-ups discussed during the meeting. Use the LLM Gateway with a specific prompt to extract these key details from the transcript text.
const { choices } = await client.chat.completions.create({
  model: 'claude-3-5-sonnet',
  messages: [{
    role: 'user',
    content: `List all action items and decisions from the following meeting transcript.\n\nTranscript:\n${transcript.text}`
  }],
  max_tokens: 500,
});

console.log('Action Items:', choices[0].message.content);
Performance optimization and best practices
Production implementation best practices:
Asynchronous Processing: For long meetings or batch processing, use asynchronous transcription. Submit your file and provide a webhook URL. AssemblyAI will notify your application when the transcript is ready, preventing your server from being tied up waiting for a response.
Error Handling: Network issues and other problems can occur. Implement try-catch blocks and check the
statusof the transcript object. If the status iserror, you can log the error message and implement a retry mechanism.Audio Quality: The quality of your transcript depends heavily on the quality of the input audio. When possible, use Zoom's option to record separate audio files for each participant. As noted in multichannel transcription guides, this method allows for Channel Diarization, which can identify speakers with 100% accuracy and significantly improve the overall accuracy of speaker diarization.
Next steps
In this tutorial, you learned two powerful methods to transcribe and analyze Zoom calls: a simple approach using saved recordings and an advanced method for live streaming. You also saw how to enrich your transcripts with speaker labels, summaries, and action items using AssemblyAI's Voice AI models.
With these building blocks, you can create sophisticated applications that unlock the valuable insights trapped in your meeting conversations. To start building, try our API for free.
Frequently asked questions about Zoom audio transcription
Does Zoom have its own audio transcription?
Yes, Zoom provides native transcription for cloud recordings on paid plans. However, developers often use specialized APIs like AssemblyAI for higher accuracy and advanced features. As API documentation shows, this includes capabilities like speaker diarization, PII redaction, and generating action items with models via LLM gateway.
Can I get a transcript of a Zoom meeting without recording it?
Yes, stream live audio to a custom RTMP server for real-time transcription without saving recordings. This enables live captions and immediate analysis.
How do I handle multiple speakers in a Zoom transcript?
Enable speaker diarization with speaker_labels: true in your AssemblyAI request. This automatically labels each speaker in the transcript.
Lorem ipsum dolor sit amet, consectetur adipiscing elit, sed do eiusmod tempor incididunt ut labore et dolore magna aliqua. Ut enim ad minim veniam, quis nostrud exercitation ullamco laboris nisi ut aliquip ex ea commodo consequat. Duis aute irure dolor in reprehenderit in voluptate velit esse cillum dolore eu fugiat nulla pariatur.
Related posts

.png)