How to build an interactive lecture summarization app
In this tutorial, we’ll learn how to build an application that automatically summarizes a lecture and lets you ask questions about the lecture material.


The new academic year has just started, and some students are surely wondering how they can leverage recent advancements in AI to aid their studies. Many schools are now uploading recorded versions of lectures so that students can go back and review at their own pace. How might we use AI to analyze these lectures?
In this tutorial, we’ll learn how to build an app that automatically summarizes lecture recordings. The app will also allow you to ask questions about the course material to get specific answers tailored to the lecture content. You can check out a demo of the app here or the source code here.
Getting started
To follow along with this tutorial, you must have:
- Python installed
- pip installed
- Git installed
- An AssemblyAI account
First, clone the repo:
Now, create a virtual environment for the project. On MacOS/Linux, run
Alternatively, on Windows, run
Next, install the required dependencies:
And finally, you can optionally set your AssemblyAI API key as an environment variable. You can do this by renaming the file .env.example to .env and then, in the file, replacing paste-your-key-here with your API key.
If you don’t do this, you will need to supply the API key in the application GUI.
Building the application
The application uses streamlit and the AssemblyAI Python SDK to build an application around LeMUR. A great feature of streamlit is that variables that exist in isolation on their own lines are automatically displayed in the GUI, so it is easy to add text simply by writing a string.
For example, the below lines are in the source code for this application:
These lines are automatically rendered as markdown in the GUI:

Given this feature, for the rest of this tutorial, we will omit such lines of text in the code in order to focus on the functional components of the application. Let’s get started.
Setting the AssemblyAI API Key
At the top of app.py, we attempt to set the AssemblyAI API key after our imports.
In particular, we try to fetch the ASSEMBLYAI_API_KEY environment variable. This variable can either exist on the system as a normal environment variable, or in a .env file which is loaded to the environment in the script using load_dotenv() of the python-dotenv package.
If the key exists, we set it as the API key for the AssemblyAI Python SDK through aai.settings.api_key = environ_key as seen here. Otherwise, we set it to None.
If no API key is supplied, we render an input text box so that the user can supply it manually.
The textbox allows a user to enter text, and then calls the set_aai_key callback function in order to set the entered key as the key stored for the AssemblyAI Python SDK.
Selecting a lecture
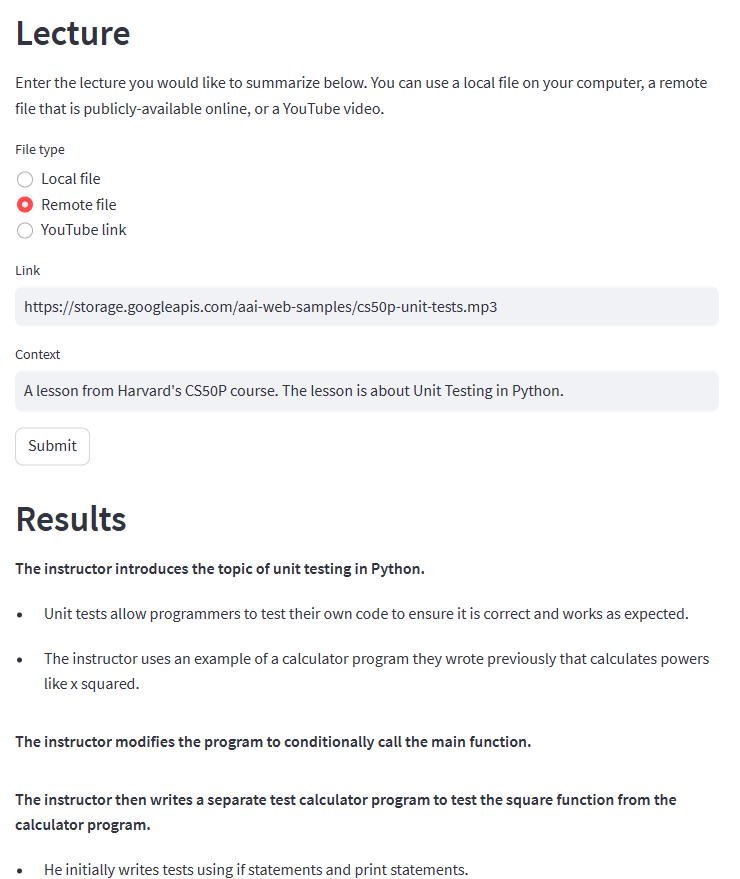
After an API key is supplied, we render a radio selector that lets the user choose from one of the allowed file types:
If a local file is uploaded to the app, we write the contents to a temporary file f so that it can be transcribed by AssemblyAI. Otherwise, we set the filename f to be the URL of the file or YouTube video.
Finally, we add a textbox for a user to supply context about the file. This is additional information that helps LeMUR understand the file by providing contextualizing information about it.
Transcribing the lecture
After a file has been selected and submitted, a transcript of the file is generated using the get_transcript function. This function simply calls the Transcriber.transcribe method in the AssemblyAI Python SDK, which transcribes either a local file or publicly available remote file. If the supplied file is a YouTube video, get_transcript first downloads the video to a temporary local file.
Once the file is transcribed, it is saved to the app’s session state so that the value persists between re-renders, and any temporary local files are removed.
Summarizing the lecture
Once the file has been transcribed, the AssemblyAI Python SDK makes it easy to summarize using the lemur.summarize method of the transcript. We simply specify an answer format as markdown and then generate the summary. After the summary has been generated, it is saved to the session state.
The results are then displayed as markdown:
Asking questions about the lecture
Finally, the AssemblyAI Python SDK once again makes it easy to ask questions about the lecture through the lemur.question method. We define an ask_question function which uses this method to take in a question and return the answer:
We then provide space for the user to enter and submit a question, after which we call the ask_question function in order to get a response. Once a response has been generated, it is displayed in the application GUI:
Running the application
To run the application, execute streamlit run app.py in a terminal from the project directory. The command will output a local URL from which you can access and use the application.
Final words
If you found this tutorial helpful, you can check out our blog for additional tutorials and learning resources on AI, like
- RLHF vs RLAIF for language model alignment
- Why Language Models Became Large Language Models
- Introduction to Generative AI
Alternatively, feel free to follow us on Twitter to stay in the loop when we release new content.
Lorem ipsum dolor sit amet, consectetur adipiscing elit, sed do eiusmod tempor incididunt ut labore et dolore magna aliqua. Ut enim ad minim veniam, quis nostrud exercitation ullamco laboris nisi ut aliquip ex ea commodo consequat. Duis aute irure dolor in reprehenderit in voluptate velit esse cillum dolore eu fugiat nulla pariatur.
Related posts