Build an AI-powered video conferencing app with Next.js and Stream
Learn to build a Next.js video conferencing app with real-time transcription and AI assistant using AssemblyAI's Universal-Streaming and LLM Gateway.


In this tutorial, you'll learn how to build a Next.js video conferencing app that supports video calls with live transcriptions and an LLM-powered meeting assistant. As recent industry research shows, AI has made its home in end-user products, making skills like these more valuable than ever.
By the end of this tutorial, you will learn everything from creating the Next.js app to implementing video call functionality with the Stream Video SDK, adding real-time transcriptions with AssemblyAI's industry-leading speech recognition, and integrating an LLM that can answer questions during the call.
Project requirements
Building an AI-powered video conferencing app requires three core dependencies: Node.js 18.17+ for the Next.js framework, a Stream account for video functionality, and an AssemblyAI account for Voice AI features.
- Node.js 18.17 or later to build with Next.js
- Free Stream Account for the video calling functionality
- AssemblyAI Account for the real-time transcription and LLM functionality
Set up the project
We provide a starter template with the Stream React SDK pre-configured. Clone it to skip the initial video setup:
- Quick start: Pre-built Next.js project with Stream integration
- Alternative: Follow the complete setup tutorial for manual configuration
Clone the starter project from GitHub:
git clone https://github.com/AssemblyAI-Community/assemblyai-transcription-llm-assistant.git
Then, go to the project folder and rename .env.template to .env and add your API keys:
NEXT_PUBLIC_STREAM_API_KEY=
STREAM_SECRET=
ASSEMBLY_API_KEY=
Get your API keys from both platforms. AssemblyAI's free tier includes transcription credits to help you get started with development.
Next, install all project dependencies with npm or yarn, and start the app:
npm install # or yarn
npm run dev # or yarn dev
Now, you can open and test the app on the given localhost port (usually 3000). You can already start a video call and talk to other people! Multiple people can now join your meeting by running the same app locally with the same callId (see next section).
Let's briefly review the app architecture before implementing real-time transcription and LLM functionality.
The architecture of the app
Here's a high-level overview of how the app works.
Folder structure and files
The Next.js project structure includes these key files:
- app/page.tsx: It contains the entry point for the app page.
- app/api/token/route.tsx: Handles API requests to the Stream API, specifically the token generation for authentication.
- components/CallContainer.tsx: Handles UI components for the video call
- component/CallLayout.tsx: Handles the layout and state changes in the app to adapt the UI
- hooks/useVideoClient.ts: Sets up the Stream video client.
Video call functionality using Stream
The Stream React Video SDK provides the core video functionality:
- Components: Pre-built UI components for video calls
- Architecture: Global edge network routing for low latency
- Features: Video/audio calling, audio rooms, live streaming
The video call is started in components/CallContainer.tsx. You can edit the callId to change the meeting room. We recommend changing the below callId to your own unique id.
const callId = '123412341234';
const callToCreate = videoClient?.call('default', callId);
Set up microphone recording for Voice AI
Real-time transcription requires microphone access to feed AssemblyAI's Universal-Streaming model.
Audio capture approach:
- Use Stream's
useMicrophoneStatehook - Access raw MediaStream object
- Buffer audio data for streaming transcription
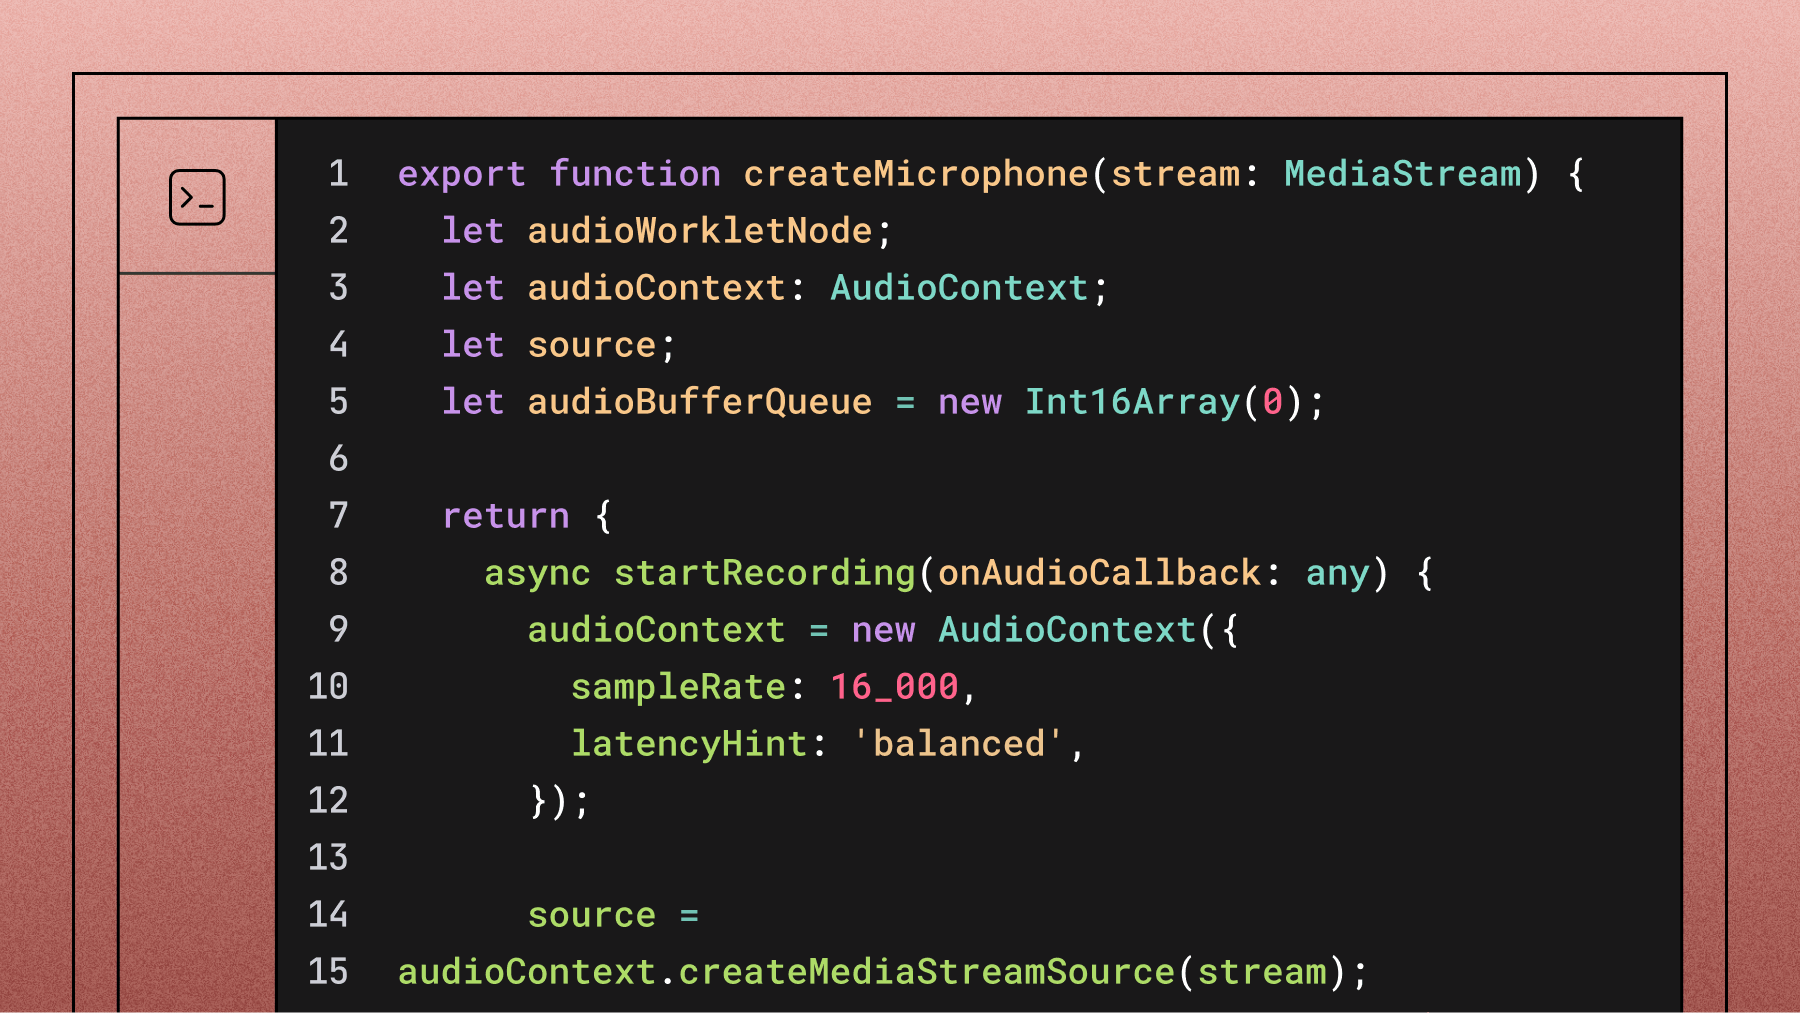
First, create a helper function in helpers/createMicrophone.ts that takes the MediaStream object. This function will manage the recording process using the AudioContext interface, buffer the incoming audio data, and pass it on for transcription.
stopRecording simply closes the connection and resets the buffer. Add the following code:
export function createMicrophone(stream: MediaStream) {
  let audioWorkletNode;
  let audioContext: AudioContext;
  let source;
  let audioBufferQueue = new Int16Array(0);

  return {
    async startRecording(onAudioCallback: any) {
      audioContext = new AudioContext({
        sampleRate: 16_000,
        latencyHint: 'balanced',
      });

      source = audioContext.createMediaStreamSource(stream);
      await audioContext.audioWorklet.addModule('audio-processor.js');
      audioWorkletNode = new AudioWorkletNode(audioContext, 'audio-processor');

      source.connect(audioWorkletNode);
      audioWorkletNode.connect(audioContext.destination);

      audioWorkletNode.port.onmessage = (event) => {
        const currentBuffer = new Int16Array(event.data.audio_data);
        audioBufferQueue = mergeBuffers(audioBufferQueue, currentBuffer);
        const bufferDuration = (audioBufferQueue.length / audioContext.sampleRate) * 1000;

        // wait until we have 100ms of audio data
        if (bufferDuration >= 100) {
          const totalSamples = Math.floor(audioContext.sampleRate * 0.1);
          const finalBuffer = new Uint8Array(
            audioBufferQueue.subarray(0, totalSamples).buffer
          );
          audioBufferQueue = audioBufferQueue.subarray(totalSamples);

          if (onAudioCallback) onAudioCallback(finalBuffer);
        }
      };
    },

    stopRecording() {
      stream?.getTracks().forEach((track) => track.stop());
      audioContext?.close();
      audioBufferQueue = new Int16Array(0);
    },
  };
}
You'll also need a helper function to merge audio buffers. This concatenates incoming audio data until you have a 100ms chunk to send for transcription. Create a file helpers/mergeBuffers.ts with the following code:
export function mergeBuffers(lhs: any, rhs: any) {
  const mergedBuffer = new Int16Array(lhs.length + rhs.length);
  mergedBuffer.set(lhs, 0);
  mergedBuffer.set(rhs, lhs.length);
  return mergedBuffer;
}
Finally, integrate these helpers into the app. In component/CallLayout.tsx, use the useCallStateHooks to access the media stream:
export default function CallLayout(): JSX.Element {
  const { useCallCallingState, useParticipantCount, useMicrophoneState } = useCallStateHooks();
  const { mediaStream } = useMicrophoneState();
Implement real-time transcription with AssemblyAI
Now that we have access to the microphone feed, we can forward the data to AssemblyAI's Universal-Streaming speech-to-text service to receive transcriptions in real time. As our product documentation shows, the service is designed to deliver immutable transcripts with sub-300ms latency, making it ideal for responsive applications.
Add the assemblyai Node SDK to the project:
npm install assemblyai # or yarn add assemblyai
Create an authentication token
To authenticate the client, we'll use a temporary authentication token. Create a Next.js route in app/api/assemblyToken/route.ts that handles the API call.
Here, we create a token with the createTemporaryToken function. You can also determine how long the token should be valid by specifying the expires_in_seconds parameter in seconds.
import { AssemblyAI } from 'assemblyai';

export async function POST() {
  const apiKey = process.env.ASSEMBLY_API_KEY;
  if (!apiKey) {
    return Response.error();
  }

  const assemblyClient = new AssemblyAI({ apiKey: apiKey });

  const token = await assemblyClient.streaming.createTemporaryToken({ expires_in_seconds: 600 });

  const response = {
    token: token,
  };

  return Response.json(response);
}
Then, add a new file helpers/getAssemblyToken.ts and add a function that fetches a token:
export async function getAssemblyToken(): Promise<string undefined=""> {
  const response = await fetch('/api/assemblyToken', {
    method: 'POST',
    headers: {
      'Content-Type': 'application/json'
    },
    cache: 'no-store',
  });

  const responseBody = await response.json();
  const token = responseBody.token;
  return token;
}</string>
Add a Real-Time transcriber
Now, we can set up an AssemblyAI streaming transcriber using the Universal-Streaming model. First, create an AssemblyAI client and use it to create a streaming transcriber that authenticates with a temporary token. Make sure that the sampleRate matches the sample rate of the microphone stream.
Set up event handlers for real-time transcription:
Turn Events:
end_of_turn: false= Ongoing speech (partial transcript)end_of_turn: true= Complete turn (final transcript)- Endpointing: Combines acoustic and semantic analysis for accurate turn detection. This intelligent feature helps distinguish between thinking pauses and the actual completion of a conversational turn.
For now, we pass both ongoing and completed turns to the UI through the setTranscribedText dispatch, but later, we will handle the two cases differently based on the end_of_turn status. Create a new file helpers/createTranscriber.ts and add the following code:
import { AssemblyAI } from 'assemblyai';
import { getAssemblyToken } from './getAssemblyToken';
import { Dispatch, SetStateAction } from 'react';

export async function createTranscriber(
  setTranscribedText: Dispatch<setstateaction>,
  setLlamaActive: Dispatch<setstateaction>,
  processPrompt: (prompt: string) => void
) {
  const token = await getAssemblyToken();
  if (!token) {
    console.error('No token found');
    return;
  }

  if (typeof token !== 'string') {
    console.error('Token must be a string, received:', typeof token, token);
    return;
  }

  const client = new AssemblyAI({
    apiKey: 'dummy', // Not used for streaming with temporary tokens
  });

  const transcriber = client.streaming.transcriber({
    token: token,
    sampleRate: 16_000,
    formatTurns: true,
  });

  transcriber.on('open', ({ id }) => {
    console.log(`Transcriber opened with session ID: ${id}`);
  });

  transcriber.on('error', (error) => {
    console.error('Transcriber error:', error);
  });

  transcriber.on('close', (code, reason) => {
    console.log(`Transcriber closed with code ${code} and reason: ${reason}`);
  });

  transcriber.on('turn', (turn) => {
    if (!turn.transcript) {
      return;
    }

    setLlamaActive(turn.transcript.toLowerCase().indexOf('llama') > 0);

    if (turn.end_of_turn) {
      // Final transcript (end of turn)
      console.log('[Turn] Final:', turn.transcript);
      setTranscribedText(turn.transcript);

      if (turn.transcript.toLowerCase().indexOf('llama') > 0) {
        console.log('Setting prompt to: ', turn.transcript);
        processPrompt(turn.transcript);
      }
    } else {
      // Ongoing turn
      console.log('[Turn] Partial:', turn.transcript);
      setTranscribedText(turn.transcript);
    }
  });

  return transcriber;
}</setstateaction></setstateaction>
Implement the LLM-powered AI assistant
To implement an LLM-powered assistant, we use AssemblyAI's LLM Gateway, a unified API for accessing leading models from providers like Anthropic, OpenAI, and Google. Instead of using a deprecated SDK method, we'll make a direct API request to the gateway.
Add a new route app/api/llmRequest/route.ts that handles the API call to the LLM Gateway. This approach avoids using an SDK for the LLM call and instead uses the native fetch API, which is a modern and flexible way to interact with HTTP endpoints.
We'll construct a prompt that includes system instructions and the user's question, which is based on the live transcript. This entire context is sent to the model to generate a relevant answer.
import { NextResponse } from 'next/server';

export async function POST(request: Request) {
  const apiKey = process.env.ASSEMBLY_AI_API_KEY;
  if (!apiKey) {
    return NextResponse.json({ error: 'AssemblyAI API key not set' }, { status: 500 });
  }

  const body = await request.json();
  const { prompt } = body;

  if (!prompt) {
    return NextResponse.json({ error: 'Prompt is required' }, { status: 400 });
  }

  const systemPrompt = `You act as an assistant during a video call. You get a question and I want you to answer it directly without repeating it. If you do not know the answer, clearly state that.`;
  const userPrompt = `Here is the user question based on the meeting transcript: ${prompt}`;

  try {
    const response = await fetch('https://llm-gateway.assemblyai.com/v1/chat/completions', {
      method: 'POST',
      headers: {
        'Content-Type': 'application/json',
        'Authorization': apiKey,
      },
      body: JSON.stringify({
        model: 'claude-3-5-haiku-20241022',
        messages: [
          { role: 'system', content: systemPrompt },
          { role: 'user', content: userPrompt },
        ],
      }),
    });

    if (!response.ok) {
      const errorText = await response.text();
      console.error('LLM Gateway Error:', errorText);
      return NextResponse.json({ error: `Error from LLM Gateway: ${errorText}` }, { status: response.status });
    }

    const llmResponse = await response.json();
    const assistantResponse = llmResponse.choices[0].message.content;

    return NextResponse.json({ response: assistantResponse });

  } catch (error) {
    console.error('Error calling LLM Gateway:', error);
    return NextResponse.json({ error: 'Failed to get response from LLM Gateway' }, { status: 500 });
  }
}
Integrate live transcription and AI assistant in the UI
We implemented all the necessary logic for both the transcription and the calls to our LLM assistant and received answers. Now, we need to show this to the users. In this part, we will connect our functionality to the UI.
Starting with the transcription itself, we first need to initialize our transcriber. We do this inside CallLayout.tsx which holds all the UI for the call using Stream's built-in UI components.
Our transcriber serves different purposes, for which we will define helper functions. These purposes are:
- Tracking the transcribed text
- Checking whether a prompt for the LLM is currently being said
- Calling when to process a prompt since the request from the user has been formulated
For the first, we need a state property for the transcribed text. The same is true for the second purpose but here we need a boolean to toggle whether or not a prompt is currently being said or not.
We add two state properties at the top of the CallLayout element:
const [transcribedText, setTranscribedText] = useState<string>('');
const [llmActive, setLllmActive] = useState<boolean>(false);
When processing the prompt we have to be able to also display an answer somehow, so we create another state property for that:
const [llmResponse, setLlmResponse] = useState<string>('');
With that, we can first define a function to process the prompt. We'll wrap it inside a useCallback hook to prevent unnecessary re-renders. Then, we initiate a call to the /api/llmRequest route we defined earlier.
We'll then set the response we get back using the setLlmResponse function that we will display to the user in a second. However, we don't want this to be shown on screen forever, so we add a timeout function (we've configured it to be called after 7 seconds, but that's just an arbitrary number).
Here's the code:
const processPrompt = useCallback(async (prompt: string) => {
  const response = await fetch('/api/llmRequest', {
    method: 'POST',
    headers: {
      'Content-Type': 'application/json'
    },
    body: JSON.stringify({ prompt: prompt }),
  });

  const responseBody = await response.json();
  const llmAssistantResponse = responseBody.response;
  setLlmResponse(llmAssistantResponse);

  setTimeout(() => {
    setLlmResponse('');
    setLllmActive(false);
    setTranscribedText('');
  }, 7000);
}, []);
With that we prepared everything we will need to initialize our transcriber. We don't want to initialize it directly, but we add a button to the UI to click and call the initialization function only then.
For this to work we need to have a reference to hold onto for the transcriber. But also, we need references for the microphone and whether transcription and LLM detection are active. So, let's add these first at the top of our CallLayout component:
const [robotActive, setRobotActive] = useState<boolean>(false);
const [transcriber, setTranscriber] = useState<any undefined="">(undefined);
const [mic, setMic] = useState<
  | {
      startRecording(onAudioCallback: any): Promise<void>;
      stopRecording(): void;
    }
  | undefined
>(undefined);
Now, we can define a initializeAssemblyAI function - again, wrapped in a useCallback hook. Here, we first create a transcriber, and then connect it to make it active.
Then, we create a microphone and connect the recorded data of it to the transcriber using its sendAudio function. Finally, we update the properties we just defined. Here's the code:
const initializeAssemblyAI = useCallback(async () => {
    try {
      const transcriber = await createTranscriber(
        setTranscribedText,
        setLllmActive,
        processPrompt
      );

      if (!transcriber) {
        console.error('Transcriber is not created');
        return;
      }

      console.log('Connecting to Universal-Streaming...');
      await transcriber.connect();

      if (!mediaStream) {
        console.error('No media stream found');
        return;
      }

      const mic = createMicrophone(mediaStream);
      console.log('Mic: ', mic, ', starting recording');
      mic.startRecording((audioData: any) => {
        transcriber.sendAudio(audioData);
      });
      setMic(mic);
      setTranscriber(transcriber);
    } catch (error) {
      console.error('Failed to initialize AssemblyAI:', error);
    }
  }, [mediaStream, processPrompt]);
Next, we add the first piece of UI to the component. We start it off with a button to activate the transcription and LLM service (calling the initializeAssemblyAI function on tap). For fun, we added a robot image to be tapped (see here in the repo).
Add the following code after the <callcontrols> element inside the CallLayout component:
<button className='ml-8' onClick={() => switchRobot(robotActive)}>
  <Image
    src={robotImage}
    width={50}
    height={50}
    alt='robot'
    className={`border-2 border-black dark:bg-white rounded-full
transition-colors ease-in-out duration-200 ${
      robotActive ? 'bg-black animate-pulse' : ''
    }`}
  />
</button>
We show a button with the image inside, and if the robotActive property is true, we add a pulsing animation to it.
For this to work, we need to add the switchRobot function. If that is clicked and the transcriber is currently active, we clean it up and close the connection to the microphone. If the transcriber is not active we initialize it.
The code for this is straightforward:
async function switchRobot(isActive: boolean) {
  if (isActive) {
    mic?.stopRecording();
    await transcriber?.close();
    setMic(undefined);
    setTranscriber(undefined);
    setRobotActive(false);
  } else {
    await initializeAssemblyAI();
    console.log('Initialized Assembly AI');
    setRobotActive(true);
  }
}
All that remains for us to do is add UI for both the transcription and the response we're getting from our LLM. We've already embedded the <speakerlayout> UI element in a container <div> that has the relative TailwindCSS property (equal to position: relative in native CSS).
We position all of the elements absolute to overlay the video feed. We start off with the LLM response. Add this code next to the <speakerlayout> element inside the containing <div>:
{llmResponse && (
  <div className='absolute mx-8 top-8 right-8 bg-white text-black
p-4 rounded-lg shadow-md'>
    {llmResponse}
  </div>
)}
We do a similar thing for the transcribedText but position it relative to the bottom:
<div className='absolute flex items-center justify-center w-full
bottom-2'>
  <h3 className='text-white text-center bg-black rounded-xl px-6
py-1'>
    {transcribedText}
  </h3>
</div>
The final piece of UI that we add is intended to indicate that we are currently listening to a query of the user. This means, that the llmActive property is true, that gets triggered when the user mentions our trigger word. We add a fun animation of a Llama (see image here) that enters the field of view while listening to a prompt and animates away when a prompt finishes processing.
Here's the code for it, adding it next to the previous two elements:
<div
  className={`absolute transition ease-in-out duration-300
bottom-1 right-4 ${
    llmActive ? 'translate-x-0 translate-y-0 opacity-100' :
'translate-x-60 translate-y-60 opacity-0'
  }`}
>
  <Image src={llamaImage} width={200} height={200} alt='llama'
className='relative' />
</div>
With this, we have finished building up the UI for our application. We can now go and run the app to see the functionality for ourselves.
Test and optimize the video conferencing app
With all the components in place, it's time to run the final application and test the features.
npm run dev # or yarn dev
Once the app is running, click the robot icon to activate live transcription. You should see your speech converted to text at the bottom of the screen. To test the AI assistant, use the trigger phrase "Hey Llama" followed by a question.
For production applications, performance is key. AssemblyAI's Universal-Streaming model is optimized for sub-300ms latency, ensuring the transcription feels instantaneous. However, you can further optimize the user experience by adding loading indicators for LLM responses and ensuring the UI remains responsive even if there are network delays.
Deploy your AI-powered video conferencing app
Your app is now ready for deployment. Since it's a Next.js application, a straightforward option is to deploy it on Vercel.
Before deploying, ensure you've configured your environment variables in your hosting provider's settings. You'll need to add NEXT_PUBLIC_STREAM_API_KEY, STREAM_SECRET, and ASSEMBLY_API_KEY.
This keeps your secret keys secure and avoids exposing them in your client-side code—a critical security practice to prevent unauthorized API use.
Once deployed, anyone with the link can join your video conference and interact with the AI features you've built.
Frequently asked questions about building video conferencing apps with Voice AI
How can I improve transcription accuracy for specific terminology?
Use AssemblyAI's Keyterms Prompting feature. By providing a list of specific terms via the keyterms_prompt parameter, you can improve accuracy for technical jargon, company names, or domain-specific vocabulary.
What are common issues when accessing the microphone stream?
Microphone issues typically stem from browser permissions requiring HTTPS and explicit user consent for microphone access.
Can I use a different LLM instead of the default one?
Yes. The AI assistant uses AssemblyAI's LLM Gateway, which provides a unified interface to various large language models. You can easily switch models by changing the model parameter in the /api/llmRequest/route.ts file. Supported models include those from Anthropic (like Claude 3.5 Haiku), OpenAI (like GPT-4o), and Google (like Gemini 2.5 Flash).
To start building your own AI-powered video conferencing app with industry-leading speech recognition, try AssemblyAI's API for free and explore the latest Voice AI features that transform voice data into actionable insights.
Lorem ipsum dolor sit amet, consectetur adipiscing elit, sed do eiusmod tempor incididunt ut labore et dolore magna aliqua. Ut enim ad minim veniam, quis nostrud exercitation ullamco laboris nisi ut aliquip ex ea commodo consequat. Duis aute irure dolor in reprehenderit in voluptate velit esse cillum dolore eu fugiat nulla pariatur.