How to Create a Real-Time Language Translation Service with AssemblyAI and DeepL in JavaScript
Learn how to translate speech in real-time in JavaScript with AssemblyAI and DeepL.


Translations are vital for communication and accessibility. Imagine a non-English-speaking tourist in an English-speaking country. If they can't translate the words of the locals, they might struggle to communicate. However, the tourist can't manually type the words into a translator since they don't speak English. With AssemblyAI's Streaming Speech-to-Text, the tourist can transcribe the speech in real time and use a translation service like DeepL to translate into their language.
In this tutorial, you'll learn how to build a web app in Node.js that uses AssemblyAI to transcribe speech from the microphone in real time and then use DeepL to translate the speech into different languages.
Before you start
To complete this tutorial, you'll need:
- An upgraded AssemblyAI account.
- A DeepL API account. Note that this is different from a regular DeepL account.
- The latest version of Node.js installed on your computer.
Set up the app
Create a directory for the app and initialize an npm project:
mkdir real-time-translation
cd real-time-translation
npm init -y
Next, log in to the DeepL API dashboard and copy the API key:
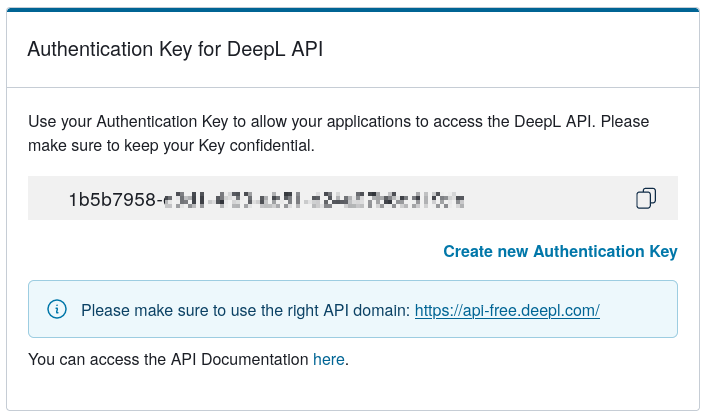
Add the DeepL API key to the .env file:
DEEPL_API_KEY=<YOUR_API_KEY>Create a file named index.js. This is where you'll write the backend. Although the real-time transcription via AssemblyAI will happen in the browser without any backend interaction, there are two reasons you'll need a backend:
- To keep the AssemblyAI API key secure. You need this key to communicate with AssemblyAI, but exposing it to the frontend can lead to security risks. You'll use this API key securely in the backend to generate a temporary token that the frontend will use.
- To keep the DeepL API key secure. For a similar reason, you'll be using DeepL's API through the backend only.
#Create the backend
In index.js, start by importing the required modules and setting up dotenv:
const express = require("express");
const deepl = require("deepl-node");
const { AssemblyAI } = require("assemblyai");

require("dotenv").config();
Instantiate an AssemblyAI client and the DeepL client using the API keys:
const authKey = process.env.DEEPL_API_KEY;
const translator = new deepl.Translator(authKey);

const client = new AssemblyAI({ apiKey: process.env.ASSEMBLYAI_API_KEY });
Configure the Express app, including the port number and the static directory:
const app = express();
const port = 3000;

app.use(express.static("public"));
app.use(express.json());
Now create the routes. The first route is the root (/) route, which serves the index.html file from the public directory:
app.get("/", (req, res) => {
  res.sendFile(__dirname + "/public/index.html");
});
The second route (/token) uses the AssemblyAI SDK to generate a temporary token and send it to the frontend:
app.get("/token", async (req, res) => {
  const token = await client.realtime.createTemporaryToken({ expires_in: 300 });
  res.json({ token });
});
The final route (/translate) uses the DeepL SDK to translate the text:
app.post("/translate", async (req, res) => {
  const { text, target_lang } = req.body;
  const translation = await translator.translateText(text, "en", target_lang);
  res.json({ translation });
});
The target_lang parameter lets you select the language for translation. The source language is set to English, as AssemblyAI Streaming Speech-to-Text currently only supports English.
Finally, start the app:
app.listen(port, () => {
  console.log(`Listening on port ${port}`);
});
Create the frontend
Create a public directory and create index.html inside it. In this file, you'll create the structure of the HTML page. You'll have two text boxes: one for the live transcription and one for the translation. You'll also have a button to start/stop the recording. Paste the following code into the file:
<!DOCTYPE html>
<html lang="en">
  <head>
    <meta charset="UTF-8" />
    <meta name="viewport" content="width=device-width, initial-scale=1.0" />
    <title>Voice Recorder with Transcription</title>
    <script src="https://cdn.tailwindcss.com"></script>
    <style>
      @keyframes pulse-animation {
        0% {
          transform: scale(1);
          opacity: 1;
        }
        50% {
          transform: scale(1.05);
          opacity: 0.7;
        }
        100% {
          transform: scale(1);
          opacity: 1;
        }
      }
      .pulse {
        animation: pulse-animation 2s infinite;
      }
    </style>
  </head>
  <body>
    <div
      class="min-h-screen flex flex-col items-center justify-center bg-gray-100 p-4"
    >
      <div
        class="w-full max-w-6xl bg-white shadow-md rounded-lg p-4 flex flex-col md:flex-row space-y-4 md:space-y-0 md:space-x-4"
      >
        <div class="flex-1">
          <label
            for="transcript"
            class="block text-sm font-medium text-gray-700"
            >Transcript</label
          >
          <textarea
            id="transcript"
            rows="20"
            class="mt-1 block w-full p-2 border border-gray-300 rounded-md shadow-sm focus:outline-none focus:ring-indigo-500 focus:border-indigo-500 sm:text-sm"
          ></textarea>
        </div>
        <div class="flex-1">
          <label
            for="translation"
            class="block text-sm font-medium text-gray-700"
            >Translation</label
          >
          <select
            id="translation-language"
            class="mt-1 block w-full p-2 border border-gray-300 rounded-md shadow-sm focus:outline-none focus:ring-indigo-500 focus:border-indigo-500 sm:text-sm"
          >
            <option value="es">Spanish</option>
            <option value="fr">French</option>
            <option value="de">German</option>
            <option value="zh">Chinese</option>
            <!-- Add more languages as needed -->
          </select>
          <textarea
            id="translation"
            rows="18"
            class="mt-1 block w-full p-2 border border-gray-300 rounded-md shadow-sm focus:outline-none focus:ring-indigo-500 focus:border-indigo-500 sm:text-sm"
          ></textarea>
        </div>
      </div>
      <button
        id="record-button"
        class="mt-4 px-6 py-2 bg-blue-500 text-white rounded-md shadow hover:bg-blue-600 focus:outline-none focus:ring-2 focus:ring-offset-2 focus:ring-blue-500"
      >
        Record
      </button>
    </div>

    <script src="https://www.unpkg.com/assemblyai@latest/dist/assemblyai.umd.min.js"></script>
    <script src="https://www.WebRTC-Experiment.com/RecordRTC.js"></script>
    <script src="main.js"></script>
  </body>
</html>
This code simply sets up two text areas. The translation box features a select element that lets you choose the language for translation. Note the language codes being used. You can find a full list of languages supported by DeepL here.
The HTML code loads the AssemblyAI SDK from the CDN. It also loads the RecordRTC library, which is used to perform real-time audio recording.
Record real-time audio
The first step in real-time translation is to record real-time audio using the user's microphone. Create a file called main.js in the public directory. Start with the following code to select the record button:
const recordBtn = document.getElementById("record-button");Then, define the global variables that'll be used later. The isRecording flag indicates whether a recording is ongoing or not, and the recorder variable will hold the object responsible for the recording:
let isRecording = false;
let recorder;
Create a run function that will hold the logic for the recording:
const run = async () => {};Add the following code to the run function to define its behavior:
if (isRecording) {
  if (recorder) {
    recorder.stopRecording();
    recorder = null;
  }
  recordBtn.innerText = "Record";
} else {
}
isRecording = !isRecording;
In the above code, you first check whether isRecording is true. If it is, you stop the existing recording and clear the recorder variable. If isRecording is false, you continue with the recording. Finally, regardless of the value, you toggle the isRecording variable.
Inside the else block, start by adding some loading text to the record button:
recordBtn.innerText = "Loading...";Next, use the MediaDevices API to fetch the available audio input devices and use RecordRTC to create a recorder from the audio stream:
navigator.mediaDevices
  .getUserMedia({ audio: true })
  .then((stream) => {
    recorder = new RecordRTC(stream, {
      type: "audio",
      mimeType: "audio/webm;codecs=pcm",
      recorderType: StereoAudioRecorder,
      timeSlice: 250,
      desiredSampRate: 16000,
      numberOfAudioChannels: 1,
      bufferSize: 16384,
      audioBitsPerSecond: 128000,
      ondataavailable: async (blob) => {
        console.log("Audio captured");
      },
    });

    recorder.startRecording();
    recordBtn.innerText = "Stop Recording";
  })
  .catch((err) => console.error(err));
Once the recorder is ready, you call the startRecording function to trigger the recording. Various options are passed to RecordRTC, but the following are the important ones:
mimeTypeensures that the recording is in the PCM16 format, which is expected by AssemblyAI.timeSlicesets 250 ms intervals between sending data to AssemblyAI.desiredSampRatesets the sample rate of the recording.
Finally, set the run function in the click event listener for the record button:
recordBtn.addEventListener("click", () => {
  run();
});
The whole file should look like this:
const recordBtn = document.getElementById("record-button");

let isRecording = false;
let recorder;

const run = async () => {
  if (isRecording) {
    if (recorder) {
      recorder.stopRecording();
      recorder = null;
    }
    recordBtn.innerText = "Record";
  } else {
    recordBtn.innerText = "Loading...";
    navigator.mediaDevices
      .getUserMedia({ audio: true })
      .then((stream) => {
        recorder = new RecordRTC(stream, {
          type: "audio",
          mimeType: "audio/webm;codecs=pcm",
          recorderType: StereoAudioRecorder,
          timeSlice: 250,
          desiredSampRate: 16000,
          numberOfAudioChannels: 1,
          bufferSize: 16384,
          audioBitsPerSecond: 128000,
          ondataavailable: async (blob) => {
            console.log("Audio captured");
          },
        });

        recorder.startRecording();
        recordBtn.innerText = "Stop Recording";
      })
      .catch((err) => console.error(err));
  }
  isRecording = !isRecording;
};

recordBtn.addEventListener("click", () => {
  run();
});
At this point, you can start the app by running the command node index.js. If you visit http://localhost:3000 in your browser, you'll see the following screen:
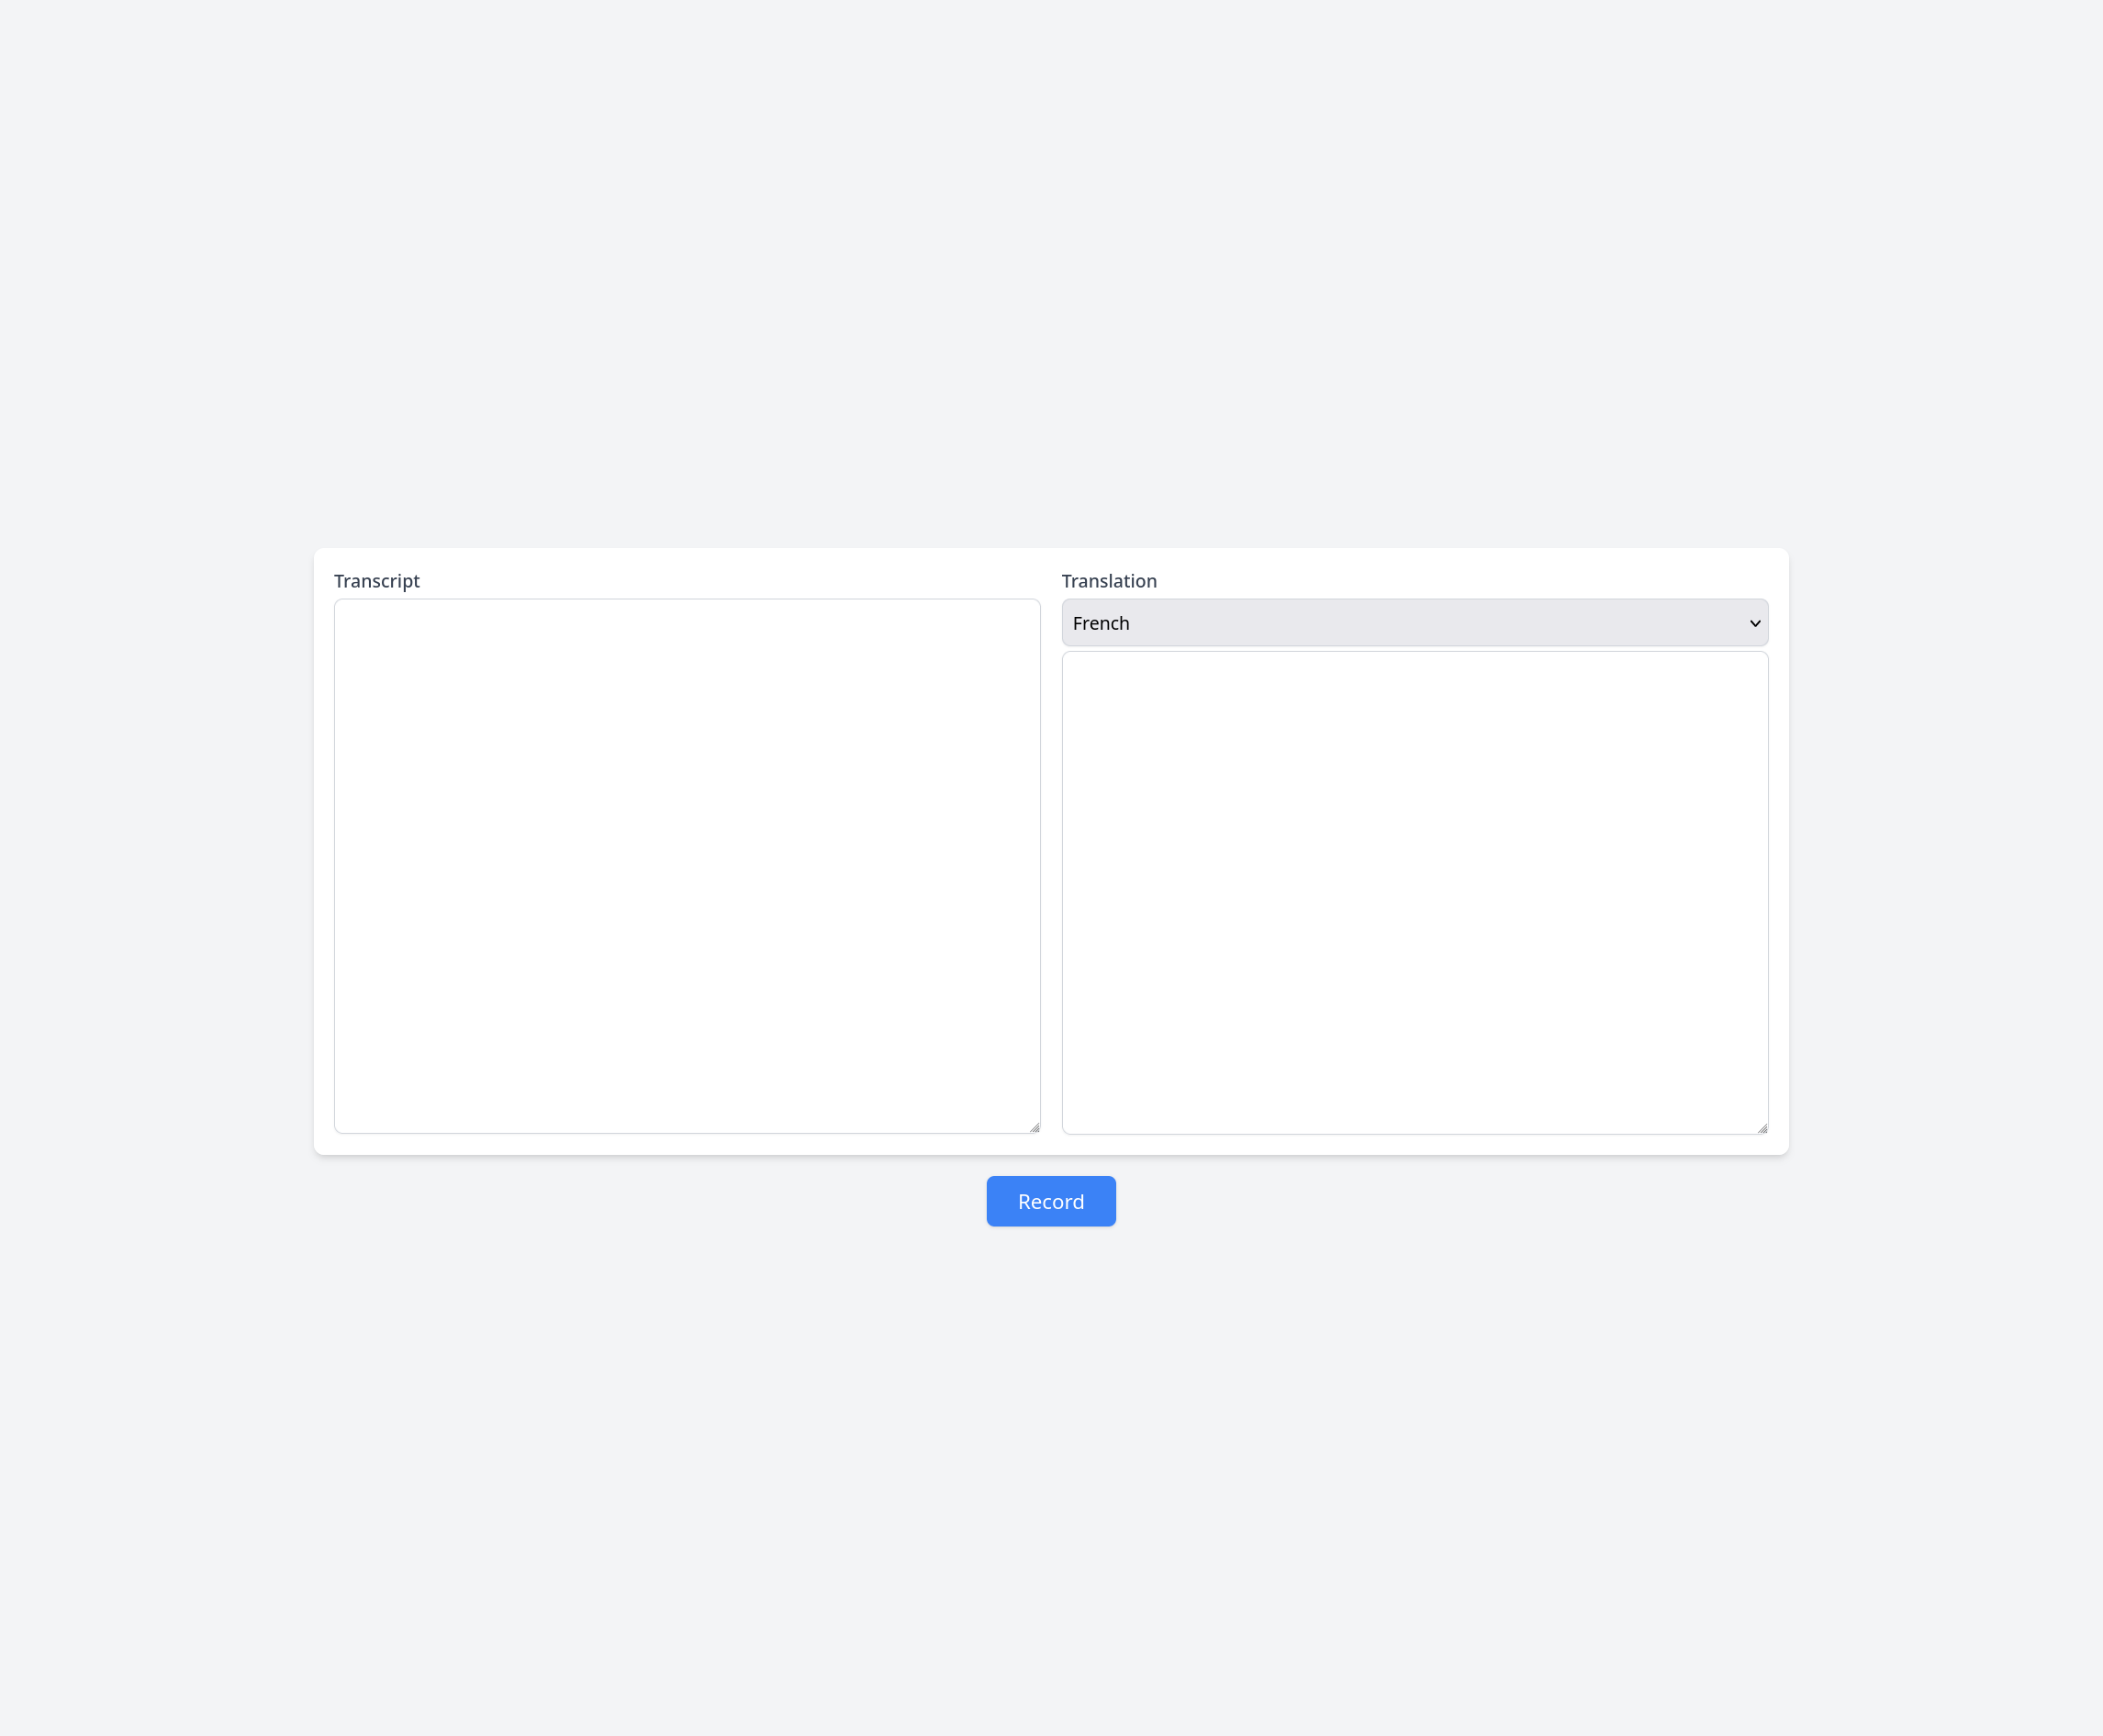
Click Record and start speaking. You should see Audio captured being logged in the console. This means your audio recording is working, and you're now ready to integrate AssemblyAI.
Transcribe the audio in real time with the AssemblyAI Speech-to-Text API
For the second step, you'll integrate AssemblyAI to transcribe the audio in real time.
At the top of main.js, add the following code to select the transcription text box:
const transcript = document.getElementById("transcript");
Where you have defined the recorder variable, define an rt variable to store the AssemblyAI real-time transcriber:
let rt;This time, in the run function, if isRecording is true, you'll additionally close the connection to AssemblyAI and also clear out the transcription text box:
const run = async () => {
    if (isRecording) {
        // Add this if block
        if (rt) {
            await rt.close(false);
            rt = null;
        }

        if (recorder) {
            recorder.stopRecording();
            recorder = null;
        }
        recordBtn.innerText = "Record";

        // Add this
        transcript.innerText = "";
    } else {
    ...
    }
    ...
}
Inside the else block, you'll now make a request to /token to get the temporary token and create an instance of RealtimeService using the token. Paste the following code after the recordBtn.innerText = "Loading..."; line:
const response = await fetch("/token");
const data = await response.json();

rt = new assemblyai.RealtimeService({ token: data.token });
Create an object to store the transcribed text as it arrives from AssemblyAI:
const texts = {};
Create a handler to react to the transcript event, which fires when a piece of transcribed text is available:
rt.on("transcript", async (message) => {
  let msg = "";
  texts[message.audio_start] = message.text;
  const keys = Object.keys(texts);
  keys.sort((a, b) => a - b);
  for (const key of keys) {
    if (texts[key]) {
      msg += ` ${texts[key]}`;
    }
  }
  transcript.innerText = msg;
});
Here’s what the above code is doing:
- AssemblyAI will keep transcribing the audio as it's streamed, and the partial transcriptions will be combined when displayed in the UI.
- When AssemblyAI detects a pause, it generates a final transcription, which includes everything spoken since the last final transcription, along with proper punctuation and text formatting (sentence case).
- When the final transcription arrives, you need to replace everything since the last final transcription with the current final transcription. To handle this, the
textsobject is used to store the transcriptions based on their start time. - The transcriptions are sorted based on the start time and joined before being displayed on the screen. When a final transcription arrives, it replaces the partial transcription at the same start time, which also replaces the joined partial transcriptions on-screen with the final transcription.
Define two more handlers to handle the error and close events:
rt.on("error", async (error) => {
  console.error(error);
  await rt.close();
});

rt.on("close", (event) => {
  console.log(event);
  rt = null;
});
Call the connect method to start a session:
await rt.connect();
Inside the ondataavailable function of recorder, send the incoming audio data to rt:
ondataavailable: async (blob) => {
    if (rt) {
        rt.sendAudio(await blob.arrayBuffer());
    }
},
The file now looks like this:
const recordBtn = document.getElementById("record-button");
const transcript = document.getElementById("transcript");

let isRecording = false;
let recorder;
let rt;

const run = async () => {
  if (isRecording) {
    if (rt) {
      await rt.close(false);
      rt = null;
    }

    if (recorder) {
      recorder.stopRecording();
      recorder = null;
    }
    recordBtn.innerText = "Record";
    transcript.innerText = "";
  } else {
    recordBtn.innerText = "Loading...";
    const response = await fetch("/token");
    const data = await response.json();

    rt = new assemblyai.RealtimeService({ token: data.token });

    const texts = {};

    rt.on("transcript", async (message) => {
      let msg = "";
      texts[message.audio_start] = message.text;
      const keys = Object.keys(texts);
      keys.sort((a, b) => a - b);
      for (const key of keys) {
        if (texts[key]) {
          msg += ` ${texts[key]}`;
        }
      }
      transcript.innerText = msg;
    });

    rt.on("error", async (error) => {
      console.error(error);
      await rt.close();
    });

    rt.on("close", (event) => {
      console.log(event);
      rt = null;
    });

    await rt.connect();

    navigator.mediaDevices
      .getUserMedia({ audio: true })
      .then((stream) => {
        recorder = new RecordRTC(stream, {
          type: "audio",
          mimeType: "audio/webm;codecs=pcm",
          recorderType: StereoAudioRecorder,
          timeSlice: 250,
          desiredSampRate: 16000,
          numberOfAudioChannels: 1,
          bufferSize: 16384,
          audioBitsPerSecond: 128000,
          ondataavailable: async (blob) => {
            if (rt) {
              rt.sendAudio(await blob.arrayBuffer());
            }
          },
        });

        recorder.startRecording();
        recordBtn.innerText = "Stop Recording";
      })
      .catch((err) => console.error(err));
  }
  isRecording = !isRecording;
};

recordBtn.addEventListener("click", () => {
  run();
});
Restart the server and try recording your voice again. You'll see the transcription happening as you speak. When you pause, the text will be replaced to include proper punctuation and uppercase letters.
Translate the text with the DeepL API
The final step is to use the DeepL SDK to translate the text and display it on the screen. You'll be performing the translation on final transcripts only. This is because partial transcripts are produced much more frequently, and trying to translate them may exhaust the API quota for DeepL or incur a high API cost. The final transcript also includes punctuation and complete context, which increases the likelihood of a correct translation. Although translating only the final transcripts introduces a slight bit of latency, as the translation only happens when you pause, it's a good trade-off that increases the accuracy of your app and reduces costs.
At the top of main.js, select the translation text box and the select element:
const translationLanguage = document.getElementById("translation-language");
const translation = document.getElementById("translation");
In the run function, if isRecording is true, clear out the translation text box:
if (isRecording) {
    …
    // Add this line
    translation.innerText = "";
}
In the else block, right after where you declare texts, declare another variable to store the translated text:
let translatedText = "";
Inside the transcript event handler, check the message_type of the incoming transcript. If it's FinalTranscript, make a request to /translate to translate the text and display it in the text box:
if (message.message_type === "FinalTranscript") {
  const response = await fetch("/translate", {
    method: "POST",
    headers: {
      "Content-Type": "application/json",
    },
    body: JSON.stringify({
      text: message.text,
      target_lang: translationLanguage.value,
    }),
  });
  const data = await response.json();
  translatedText += ` ${data.translation.text}`;
  translation.innerText = translatedText;
}
The whole code is as follows:
const recordBtn = document.getElementById("record-button");
const transcript = document.getElementById("transcript");
const translationLanguage = document.getElementById("translation-language");
const translation = document.getElementById("translation");

let isRecording = false;
let recorder;
let rt;

const run = async () => {
  if (isRecording) {
    if (rt) {
      await rt.close(false);
      rt = null;
    }

    if (recorder) {
      recorder.stopRecording();
      recorder = null;
    }
    recordBtn.innerText = "Record";
    transcript.innerText = "";
    translation.innerText = "";
  } else {
    recordBtn.innerText = "Loading...";
    const response = await fetch("/token");
    const data = await response.json();

    rt = new assemblyai.RealtimeService({ token: data.token });

    const texts = {};
    let translatedText = "";

    rt.on("transcript", async (message) => {
      let msg = "";
      texts[message.audio_start] = message.text;
      const keys = Object.keys(texts);
      keys.sort((a, b) => a - b);
      for (const key of keys) {
        if (texts[key]) {
          msg += ` ${texts[key]}`;
        }
      }
      transcript.innerText = msg;
      if (message.message_type === "FinalTranscript") {
        const response = await fetch("/translate", {
          method: "POST",
          headers: {
            "Content-Type": "application/json",
          },
          body: JSON.stringify({
            text: message.text,
            target_lang: translationLanguage.value,
          }),
        });
        const data = await response.json();
        translatedText += ` ${data.translation.text}`;
        translation.innerText = translatedText;
      }
    });

    rt.on("error", async (error) => {
      console.error(error);
      await rt.close();
    });

    rt.on("close", (event) => {
      console.log(event);
      rt = null;
    });

    await rt.connect();

    navigator.mediaDevices
      .getUserMedia({ audio: true })
      .then((stream) => {
        recorder = new RecordRTC(stream, {
          type: "audio",
          mimeType: "audio/webm;codecs=pcm",
          recorderType: StereoAudioRecorder,
          timeSlice: 250,
          desiredSampRate: 16000,
          numberOfAudioChannels: 1,
          bufferSize: 16384,
          audioBitsPerSecond: 128000,
          ondataavailable: async (blob) => {
            if (rt) {
              rt.sendAudio(await blob.arrayBuffer());
            }
          },
        });

        recorder.startRecording();
        recordBtn.innerText = "Stop Recording";
      })
      .catch((err) => console.error(err));
  }
  isRecording = !isRecording;
};

recordBtn.addEventListener("click", () => {
  run();
});
Reload the web page and click Record. As you speak, the transcription will appear. Whenever you pause, the transcription will be replaced with the final transcription, and the translation will appear.
You can find the full code on GitHub.
Conclusion
In this article, you learned how the AssemblyAI Speech-to-Text API can be used to transcribe audio in real time. You then used DeepL to translate the audio into different languages.
AssemblyAI can do much more than transcribing real-time audio. With Speech-to-Text, you can asynchronously transcribe any audio file, along with speaker diarization, profanity filtering, custom spelling, and custom vocabulary. You can also leverage LLMs to gather insights from your audio data.
Lorem ipsum dolor sit amet, consectetur adipiscing elit, sed do eiusmod tempor incididunt ut labore et dolore magna aliqua. Ut enim ad minim veniam, quis nostrud exercitation ullamco laboris nisi ut aliquip ex ea commodo consequat. Duis aute irure dolor in reprehenderit in voluptate velit esse cillum dolore eu fugiat nulla pariatur.
Related posts