

universal-3-6-pro for streaming speech-to-text, claude-haiku-4-5-20251001 through LLM Gateway for the reply, and the aai-kyla voice for text-to-speech.
Overview
In this guide we’ll build a voice agent on an ESP32-S3 with an INMP441 MEMS microphone and a MAX98357A amplifier and speaker. Mic audio is sampled as PCM16 at 16 kHz and relayed over a secure WebSocket to a Deno edge server, which talks to AssemblyAI. The reply plays out of the speaker at 24 kHz, and you can interrupt it at any time with a button or touchpad. The voice architecture design comes from ElatoAI, an MIT-licensed, open-source project that ships the ESP32 firmware, the Deno edge server, and a Next.js webapp with a Supabase DB. The AssemblyAI Deno server files are live in the same repo. Let’s dive in!We’ll set
ASSEMBLYAI_API_KEY on the edge server only, so the key never touches the device. You can get one from the AssemblyAI dashboard. The Voice Agent API also needs an account with Voice Agent API access.Architecture
Hardware
Here’s what we need:Wiring
Let’s wire the boards to the ESP32-S3. The pin numbers below are the defaults infirmware-arduino/src/Config.cpp, so if you use other pins, change them there.
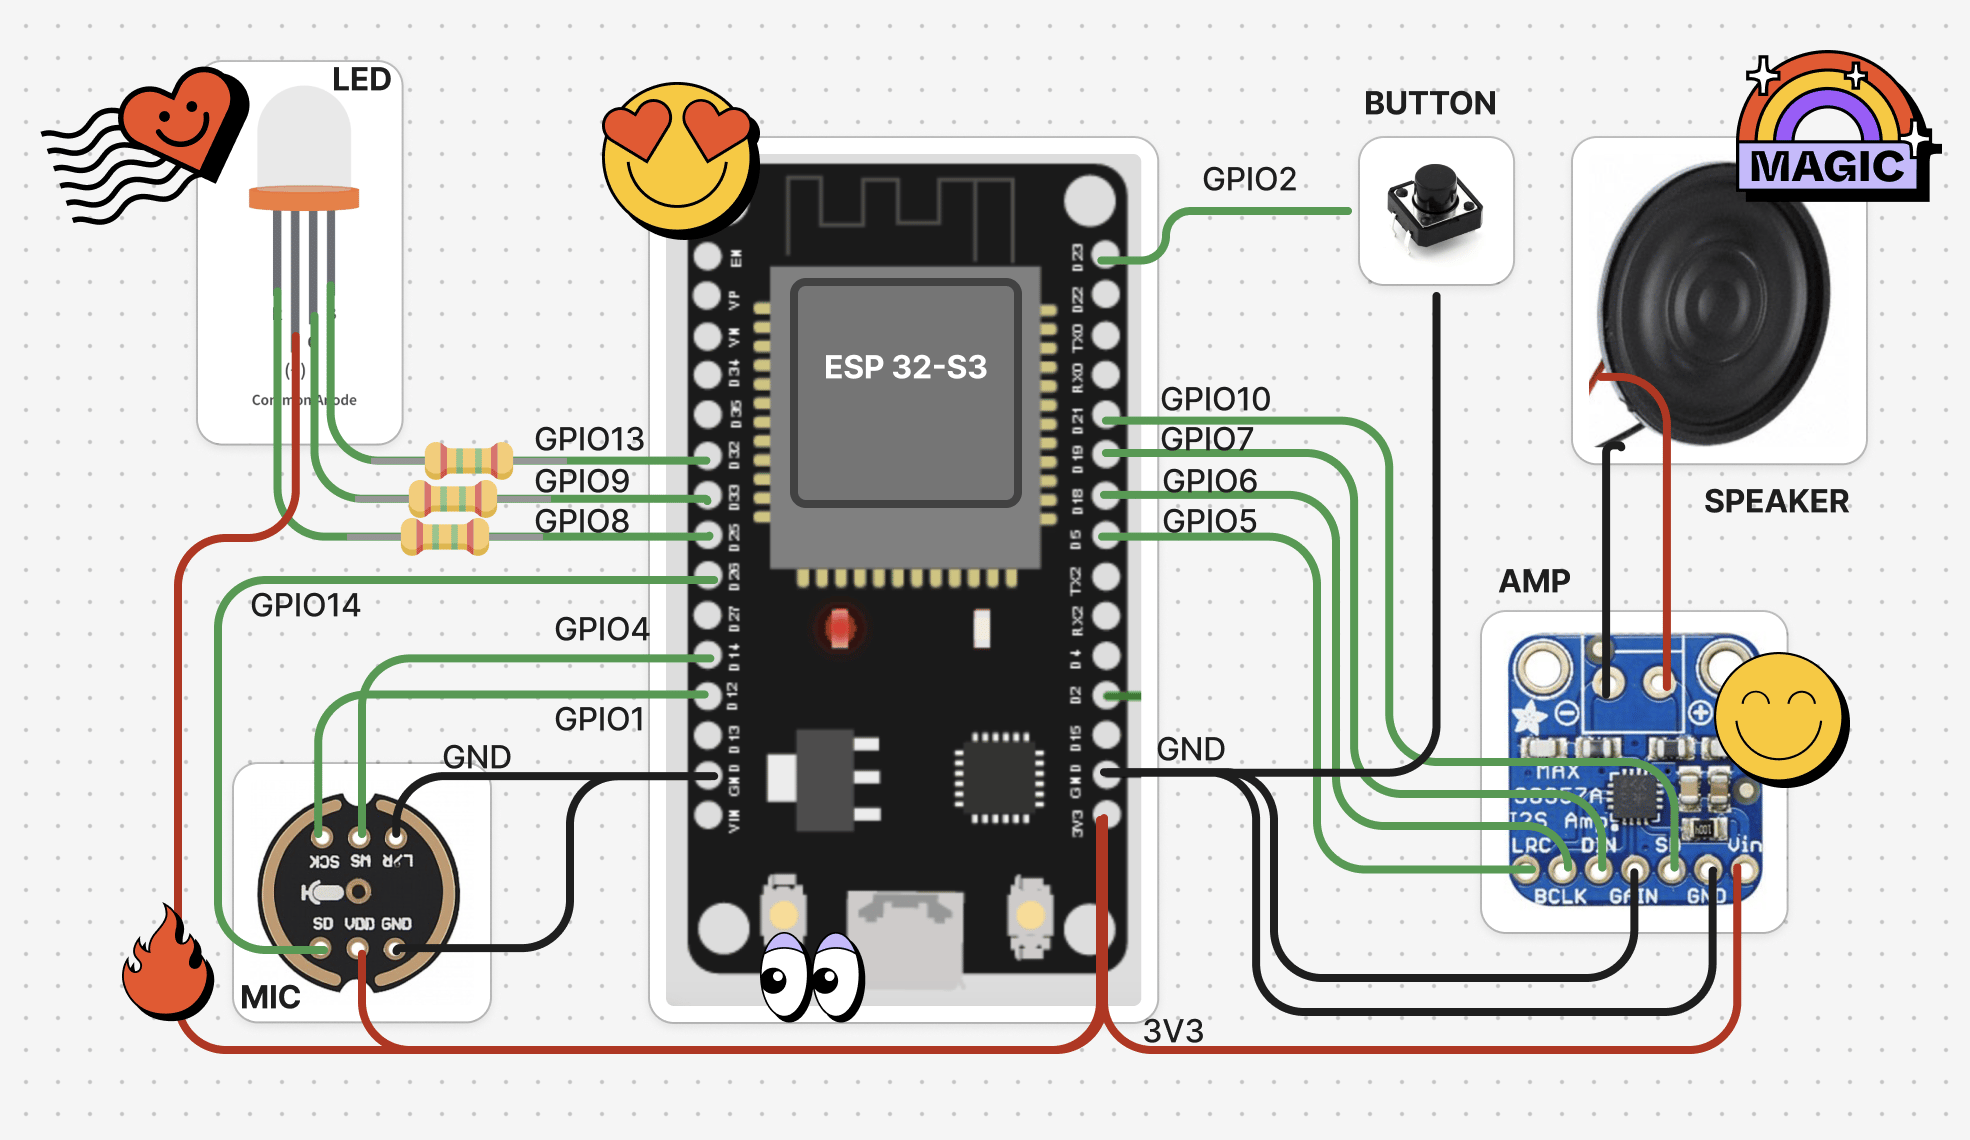
Wiring for the ElatoAI firmware with a starter conversational AI board. Red is power, black is ground, green is signal.
The mic and the amp use separate I2S ports, so they don’t share clock pins. Keep the jumper wires short, and make sure every module shares a ground with the ESP32.
Build the voice agent
Before you start, you need:- The hardware above, wired up.
- PlatformIO to flash the firmware, and Deno to run the edge server.
- A Supabase project and the Elato web app running locally. The ElatoAI quickstart covers both.
- An AssemblyAI API key with Voice Agent API access.
Step 1: Clone the repo
Step 2: Set your environment variables
The edge server holds your API key, so it never touches the device. You can get one from the AssemblyAI dashboard. The Voice Agent API needs an account with Voice Agent API access.server/deno/.env. The server stores conversations in Supabase, so it needs your Supabase project URL and anon key too:
server/deno/.env
Step 3: Run the Deno edge server
Next up is the Deno edge server inserver/deno. It relays audio between the ESP32 and AssemblyAI’s Voice Agent API over a single WebSocket. When a device connects, the server opens that WebSocket and sets up the session with one session.update event. We pass in the system prompt, the audio format going in, the voice, and the audio format coming out.
The voice and the output format can’t change after this first update. The agent speaks English, Italian, Spanish, German, Portuguese and French.
server/deno/models/assemblyai.ts
reply.create event and the model composes the greeting itself. From there AssemblyAI handles turn-taking, so it decides when you’re done talking. The agent’s voice comes back as reply.audio events, which we encode to Opus and send to the ESP32.
server/deno/models/assemblyai.ts
session.end so you aren’t billed for the reconnect grace window.
Time to run it. Start the server from server/deno:
ws://<your-computer-ip>:8000. There’s no TLS on this hop yet. We’ll fix that in Step 6 when we deploy the server to a remote host.
Last piece: in the web app, create a character, pick AssemblyAI as its voice provider, and choose a voice like alba, eve or george.
The server reads the provider every time a device connects, so you can switch a character’s provider without restarting the server or reflashing the ESP32.
Step 4: Flash the firmware
The firmware ships inELATO_MODE, which connects to Elato’s hosted server. To use your own server, open firmware-arduino/src/Config.h and switch to DEV_MODE with the Deno server:
firmware-arduino/src/Config.h
firmware-arduino/src/Config.cpp, set both addresses in the DEV_MODE block to your computer’s LAN IP. Don’t use localhost, because the ESP32 is a separate device on your network. backend_server is where the Elato web app runs:
firmware-arduino/src/Config.cpp
ELATO-DEVICE. Join it from your phone or laptop, open http://192.168.4.1/wifi, and enter your 2.4 GHz network name and password. The board then restarts and joins your network.
Step 5: Talk to it
Once the serial monitor shows the device is connected, the speaker should start playing out the AI agent’s voice. Start talking to the agent and you should hear it respond. Depending on your setup, you can press the button or touchpad to interrupt it mid-speech.Step 6: Deploy and switch to WSS
So far the ESP32 has been talking to your computer overws:// and http://, and both are unencrypted. Anyone on the same network can read the audio and the auth token. That’s fine on your own home Wi-Fi while we develop, but not once the traffic crosses the internet.
For a remote server, we’ll use wss://. It’s the same WebSocket protocol inside TLS, so the traffic is encrypted and can’t be read or changed on the way.
Let’s deploy
server/deno to Deno Deploy or another Deno-compatible host close to your users, and set ASSEMBLYAI_API_KEY and your Supabase settings as environment variables there. Then, in firmware-arduino/src/Config.h, we switch to PROD_MODE, and in firmware-arduino/src/Config.cpp we fill in the production block:
firmware-arduino/src/Config.cpp
firmware-arduino/src/Audio.cpp
TLS only protects us from a man-in-the-middle attack if the device checks the server’s certificate. In
PROD_MODE the firmware calls beginSslWithCA with the CA_cert you paste into Config.cpp, and it refuses any server that can’t prove its identity. Paste your host’s root CA certificate there. The hops from the edge server to AssemblyAI always use wss:// and https://, even in local development.Optional: STT, LLM Gateway and Text-to-Speech pipeline
The Voice Agent API is the quickest way to get going. But if you want to choose each model yourself, say to pin the speech-to-text model, use any LLM Gateway model, or pick a specific text-to-speech voice, we can run the same AssemblyAI products as three separate connections instead. The architecture stays the same. The device still talks to the same edge server, and a provider is just one file inserver/deno/models/ that the server picks based on the character’s provider. To use the pipeline, we add one more provider next to assemblyai.ts.
Add the provider file
Createserver/deno/models/assemblyai-pipeline.ts. It connects to three AssemblyAI endpoints, and each one authenticates with your API key.
Generate and Flush, encode the PCM we get back to Opus for the device, and send Cancel if you interrupt.
Register the provider
Inserver/deno/main.ts, we import the provider and add a case to the provider switch:
server/deno/utils.ts, we add the settings the provider imports. The voice is a text-to-speech voice slug like aai-kyla, which is AssemblyAI’s default voice (you can browse the rest in the voice catalog), and the model is an LLM Gateway model:
ASSEMBLYAI_API_KEY. To change the LLM, set ASSEMBLYAI_LLM_MODEL in server/deno/.env.
How it works
- Listening. Once the device is awake and connected, it streams your mic to the server while it’s in the listening state, and AssemblyAI’s turn detection decides when you’re done talking, so you don’t hold a button to talk. The device stops streaming the mic while the agent is speaking.
- One reply at a time. Each finished turn gets one reply, and we log both sides of the conversation to Supabase.
- Interrupting. The device doesn’t stream your mic while the agent is speaking, so you interrupt with a short tap on the button or touchpad. We cancel the current reply, the device stops playing, and it goes back to listening.
- Opus on the way back. Mic audio goes up as PCM16, which is about 32 KB/s. We encode the reply to Opus on the server, so the downstream traffic stays small even on a weak Wi-Fi link and decode it back on the ESP32.
Limitations
After running this design and the framework on hundreds of ESP32 devices globally, here are the limits Akash Deb, founder of Elato, and his team have documented:- Cold starts. Connecting to a freshly started edge server takes about 2 to 3 seconds.
- Session length. Edge hosts end a connection when their wall-clock limit is reached. The team has tested up to 17 minutes of uninterrupted voice AI conversation.
- Interruptions. For ESP32 boards without echo cancellation, we cannot detect barge-in while the AI agent is speaking. It only stops playing when the server tells it to, or when the user explicitly sends a button/touchpad interrupt signal.
Troubleshooting
Most problems come down to Wi-Fi, wiring or power. Keep the serial monitor open withpio device monitor, because it shows how far the device got.
Wi-Fi never connects
- Use a 2.4 GHz network. The ESP32-S3 can’t see 5 GHz Wi-Fi. If your router puts both bands under one name and the device won’t join, create a separate 2.4 GHz network. On an iPhone hotspot, turn on Maximize Compatibility.
- Check the credentials. Wi-Fi names and passwords are case-sensitive. Networks with a login page or a username, like hotel and office Wi-Fi, can be a problem for a device without a screen.
- Power-cycle the board after you change Wi-Fi credentials.
Server never connects
The device joins Wi-Fi, but it never reaches the voice server.ws://andwss://are mixed up.DEV_MODEconnects withws://and expects your local server on port8000. Any other mode connects withwss://on port443. A local server only acceptsws://, and a hosted one only acceptswss://.- The device can’t reach your computer.
ws_serverandbackend_servermust be your computer’s LAN IP, notlocalhost. To check, openhttp://<your-computer-ip>:8000from a phone on the same Wi-Fi. If it doesn’t load, allow incoming connections for Deno in your firewall, and avoid guest networks, which often stop devices from reaching each other. - The device never got a token. Look for
[Auth] Registration HTTPin the serial monitor. Anything other than200means the device couldn’t reach the web app atbackend_serverandbackend_port. - The TLS handshake fails in
PROD_MODE.CA_certmust be your host’s root CA certificate. If it’s wrong or empty, the firmware rejects the server.
No transcripts from the mic
The server connects, but the agent never reacts to anything you say.- Recheck the three I2S wires. SCK, WS and SD must go to the pins in the wiring table. A single wire in the wrong place gives you silence, not an error.
- Tie L/R to GND. The firmware reads the left channel, and a floating L/R pin gives silence or noise.
- Power the mic from 3V3, and check that its ground reaches the ESP32.
- Shorten the wires. Long or loose jumper wires corrupt the I2S clock, so reseat them or solder the connections.
No sound from the speaker
You can see the agent’s reply in the web app, but you hear nothing, or only static.- Recheck BCLK, LRC and DIN. Swapping BCLK and LRC is the most common mistake.
- Wire the amp’s SD pin to its GPIO. The firmware mutes the amp by driving SD low between replies, so if SD isn’t connected to the pin in the wiring table, the amp can stay muted.
- Test the speaker on its own. Get a small internet-radio sketch playing through the MAX98357A. If the radio plays, your wiring and I2S pins are fine, and the problem is in the audio stream. If it doesn’t, recheck the pins in
Config.cpp.
Board resets or audio crackles
The board reboots when Wi-Fi connects or when the agent starts speaking, and the serial monitor may printBrownout detector was triggered. That’s a USB brownout. Wi-Fi and the amplifier draw current in bursts, and a weak USB port or a thin cable can’t keep the voltage up.
- Change the cable and the port. Use a short, good-quality USB cable plugged straight into your computer, or a 5 V supply rated for 1 A or more. Avoid unpowered hubs.
- Add a capacitor. 470 µF or more across the amp’s VIN and GND soaks up the current spikes.
- Lower the load. An 8 Ω speaker draws less current than a 4 Ω one.
Customize and extend
Here are a few ways to make it your own:- Change the persona and the voice in the web app.
- Add tool calls like timers or smart-home actions. We declare them in
session.update, run them in the server, and send the results back. - Deploy the server near your users. End-to-end latency comes from Wi-Fi, network distance, model time and playback, so measure it on your own hardware and region.
Next steps
- ElatoAI on GitHub — The full open-source project: firmware, Deno edge server, and web app
- ElatoAI Quickstart — Full setup details for Supabase, the web app and the firmware
- Voice Agent API — Learn more about the managed Voice Agent API
- Best practices for building voice agents — Tips for getting the most out of AssemblyAI in a voice agent
- Text-to-Speech quickstart — Turn text into speech with one SDK call or HTTP request
- Text-to-Speech voices — Browse the voice catalog and learn how to name a voice with
voice_id