How to build and deploy a voice agent using Pipecat and AssemblyAI
Ship voice AI agents with millisecond latency using Pipecat and AssemblyAI's Universal-Streaming. This complete tutorial walks you through setup, real-time transcription, testing, and cloud deployment.


Building a voice AI agent that responds in milliseconds used to require months of audio engineering. Today, you can ship a production-ready voice agent in hours.
Modern voice agents need three things to feel natural: millisecond-level latency, accurate transcription even with background noise, and intelligent conversation management. Each comes with specific challenges—getting names and numbers right, managing turn-taking without awkward interruptions, and keeping latency low.
In this tutorial, we’ll build a production-ready voice agent using Pipecat’s orchestration framework, AssemblyAI’s Universal-3 Pro Streaming speech-to-text, OpenAI’s reasoning, and Cartesia’s voice synthesis. You’ll create it, test it locally, and deploy it to the cloud.
Understanding the architecture
This agent uses a cascading model, where each specialized AI service handles one stage of the conversation. Think of it as a production line your voice passes through:
- Speech recognition: AssemblyAI’s Universal-3 Pro Streaming converts speech to text with intelligent turn detection.
- Processing: Pipecat orchestrates the data flow between services.
- Understanding: OpenAI’s LLM interprets the text and generates a response.
- Speech synthesis: Cartesia turns the response back into natural speech.
- Delivery: Daily’s WebRTC infrastructure handles real-time communication.
This modular design lets you swap components, optimize for specific use cases, and scale each service independently. Pipecat is the conductor—managing timing, interruptions, and the complex dance of real-time conversation. For business-critical applications, consider reliability requirements too; AssemblyAI provides SLAs with specific uptime guarantees.
Prerequisites and setup
Before you start, make sure you have:
- Python 3.10 or higher
- The UV package manager
- Docker Desktop for containerization
- A terminal with shell access
Important: Pipecat Cloud requires ARM64 architecture for deployment. On an Intel Mac or Windows machine, you’ll build multi-architecture Docker images.
Create the project:
mkdir pipecat-voice-agent && cd pipecat-voice-agent
uv tool install pipecatcloud
pcc auth login
pcc init
The pcc init command generates a pre-configured project structure. Open it in your editor and update requirements.txt:
pipecat-ai[assemblyai,openai,cartesia,daily,silero,webrtc]
pipecatcloud
python-dotenv
Initialize your environment:
uv venv
uv pip install -r requirements.txt
Configuring API keys
The agent needs API keys from four services:
Copy env.example to .env and add your keys:
cp env.example .envYour .env should look like this:
ASSEMBLYAI_API_KEY=your_assemblyai_key_here
OPENAI_API_KEY=your_openai_key_here
CARTESIA_API_KEY=your_cartesia_key_here
DAILY_API_KEY=your_daily_key_here
Implementing AssemblyAI speech recognition
Now integrate AssemblyAI’s Universal-3 Pro Streaming, which provides real-time transcription optimized for conversational AI. For the complete, current setup, see the Universal-3 Pro Streaming on Pipecat guide. Open bot.py and add the import:
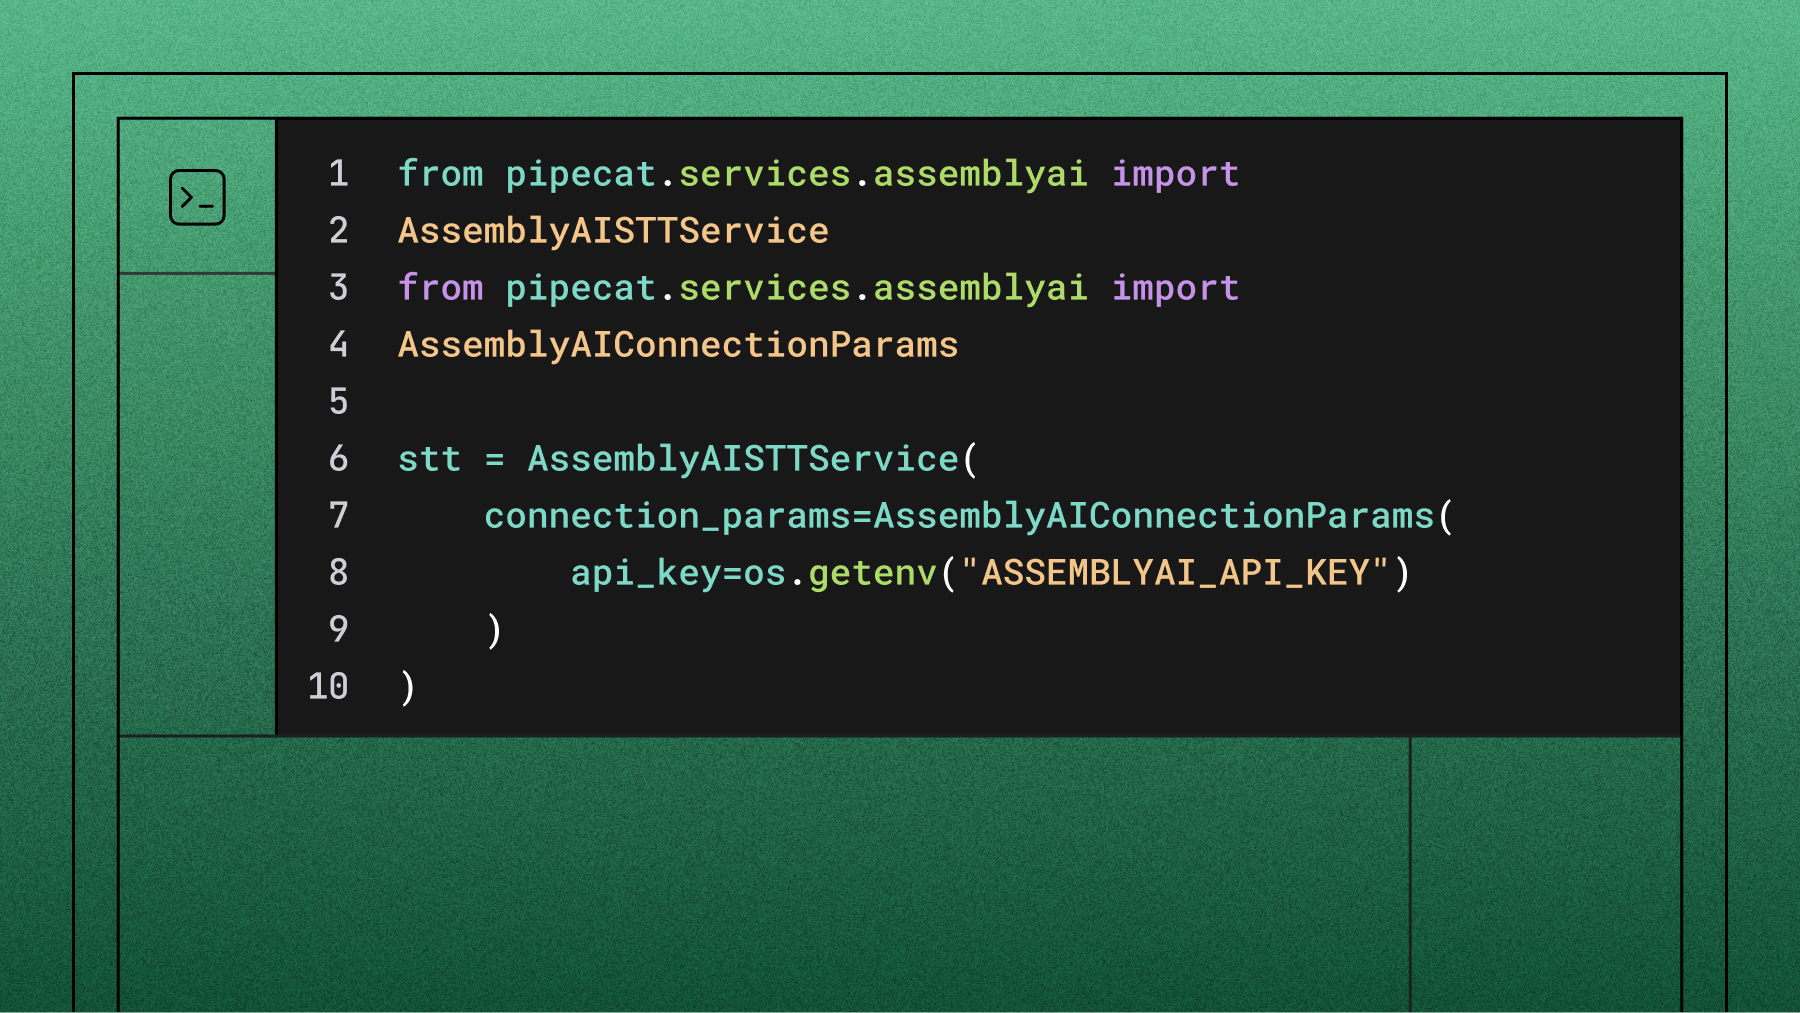
from pipecat.services.assemblyai.stt import AssemblyAISTTServiceInitialize the STT service with your API key:
stt = AssemblyAISTTService(
    api_key=os.getenv("ASSEMBLYAI_API_KEY"),
    settings=AssemblyAISTTService.Settings(
        model="u3-rt-pro",
    ),
)
For more natural conversations, tune turn detection. With Pipecat, vad_force_turn_endpoint chooses the mode: leave it at the default True to let Pipecat’s VAD + Smart Turn decide when the user is done speaking (recommended for responsive interruptions), or set it to False to use AssemblyAI’s built-in, STT-based turn detection. min_turn_silence controls how quickly a turn ends once the model is confident:
stt = AssemblyAISTTService(
    api_key=os.getenv("ASSEMBLYAI_API_KEY"),
    settings=AssemblyAISTTService.Settings(
        model="u3-rt-pro",
        min_turn_silence=100,   # ms of silence before ending a turn when
confident (lower = snappier)
    ),
    vad_force_turn_endpoint=True,  # default: Pipecat-controlled turn
detection (VAD + Smart Turn)
)
Positioning matters in the pipeline. Place the STT service before the user context aggregator so the aggregator receives the transcribed text it needs to build the LLM context:
pipeline = Pipeline([
    transport.input(),
    stt,                        # AssemblyAI transcribes audio here
    context_aggregator.user(),
    llm,
    tts,
    transport.output(),
    context_aggregator.assistant(),
])
To watch transcripts during development, add a transcript processor. The on_transcript_update handler receives a frame whose .messages attribute holds the new transcript messages:
from pipecat.processors.transcript_processor import TranscriptProcessor

transcript_processor = TranscriptProcessor()

pipeline = Pipeline([
    transport.input(),
    stt,
    transcript_processor.user(),
    context_aggregator.user(),
    llm,
    tts,
    transport.output(),
    transcript_processor.assistant(),
    context_aggregator.assistant(),
])

@transcript_processor.event_handler("on_transcript_update")
async def on_transcript_update(processor, frame):
    for message in frame.messages:
        print(f"{message.role}: {message.content}")
Testing locally
Before deploying, confirm everything works on your machine. The generated code includes a local-run flag:
env LOCAL_RUN=1 uv run bot.py
You should see the bot initialize and connect to Daily’s WebRTC service. Speak into your microphone and watch the transcripts appear. The agent should respond naturally to questions like “What is Pipecat?” or “Tell me about AI voice agents.”
Common issues during local testing:
Building and deploying to the cloud
Pipecat Cloud simplifies deployment but needs specific configuration. First, update pcc-deploy.toml:
agent_name = "my-voice-agent"
image = "yourdockerhub/my-voice-agent:latest"
secret_set = "my-voice-agent-secrets"
Critical: build your Docker image for ARM64:
docker build --platform=linux/arm64 -t my-voice-agent .
docker tag my-voice-agent yourdockerhub/my-voice-agent:latest
docker push yourdockerhub/my-voice-agent:latest
On an x86 machine, use buildx for multi-platform builds:
docker buildx build --platform=linux/arm64 -t
yourdockerhub/my-voice-agent:latest --push .
Upload your secrets:
pcc secrets set my-voice-agent-secrets --file .envDeploy:
pcc deployStart your agent with Daily’s interface:
pcc agent start my-voice-agent --use-daily --api-key YOUR_PIPECAT_API_KEY
You’ll receive a URL to interact with your deployed agent through a web interface.
Next steps
You’ve built a production-ready voice agent that combines best-in-class AI services. The complete code for this tutorial includes additional features and optimizations.
Consider enhancing your agent with:
- Multi-language support: configure language detection and response.
- Advanced turn detection: fine-tune conversation-flow parameters, and use keyterms_prompt to prime the model for terms expected at each step.
- Speech Understanding: add sentiment analysis or content moderation.
For deployment options beyond Pipecat Cloud, AssemblyAI offers self-hosted and Voice AI Cloud options. Join the Pipecat Discord for support, and explore AssemblyAI’s documentation for advanced features. And if you’d rather not assemble the pipeline yourself, the Voice Agent API bundles STT, LLM, and TTS into one WebSocket connection at $4.50/hr flat.
Frequently asked questions
What is Pipecat and how does it work with AssemblyAI?
Pipecat is an open-source Python framework from Daily for orchestrating real-time voice and multimodal AI agents. It connects your speech-to-text, LLM, and text-to-speech services and manages timing, turn-taking, and interruptions—and it integrates natively with AssemblyAI’s Universal-3 Pro Streaming model for the speech-recognition layer.
How do I add AssemblyAI speech-to-text to a Pipecat voice agent?
Install pipecat-ai[assemblyai], import AssemblyAISTTService, initialize it with your API key and settings=AssemblyAISTTService.Settings(model="u3-rt-pro"), and place it in the pipeline before the user context aggregator (so the aggregator receives the transcribed text). AssemblyAI’s Pipecat integration guide provides the full, current setup including turn-detection parameters.
Why does my Pipecat transcript handler fail with a “messages” error?
The on_transcript_update event handler receives a frame whose .messages attribute holds the new transcript messages, so iterate over frame.messages. If it raises, the usual cause is pipeline placement: make sure transcript_processor.user() sits after STT and transcript_processor.assistant() sits after transport.output(), otherwise no transcript messages are emitted for the handler to read.
Why does Pipecat Cloud deployment require ARM64?
Pipecat Cloud runs containers on ARM64 infrastructure, so your Docker image must target linux/arm64. On Intel Macs or Windows machines, use docker buildx to build and push a multi-platform image, otherwise the deployed container will fail to start.
What’s the difference between using Pipecat and AssemblyAI’s Voice Agent API?
Pipecat gives you full, vendor-neutral control to assemble and customize each component of the pipeline yourself. AssemblyAI’s Voice Agent API takes the opposite approach—it bundles STT, LLM, and TTS into a single WebSocket connection at $4.50/hr flat, so you skip orchestration entirely when you don’t need component-level control.
How accurate is AssemblyAI’s speech-to-text for voice agents?
Universal-3 Pro Streaming is built for entity accuracy—names, phone numbers, emails, and account numbers—which are the tokens a voice agent acts on, and it returns immutable transcripts in under 300ms. That combination of low latency and high entity accuracy is what keeps a Pipecat agent’s conversation flowing naturally.
Lorem ipsum dolor sit amet, consectetur adipiscing elit, sed do eiusmod tempor incididunt ut labore et dolore magna aliqua. Ut enim ad minim veniam, quis nostrud exercitation ullamco laboris nisi ut aliquip ex ea commodo consequat. Duis aute irure dolor in reprehenderit in voluptate velit esse cillum dolore eu fugiat nulla pariatur.
Related posts