How to build a free Whisper API with GPU backend
Learn how to make a free, GPU-powered Whisper API for transcribing audio files


More and more developers are embedding Speech AI into their applications to build modern user experiences. These features range from straightforward Speech-to-Text capabilities to more complicated Audio Intelligence and LLM-powered features like PII redaction call/video summaries.
For developers looking to explore this landscape, Whisper is a great choice for Speech-to-Text. It is an open-source, open-weight model that is much easier to use than other open-source options that are now all but obsolete, like Kaldi and DeepSpeech.
However, to get transcripts that are sufficiently accurate for many applications, large Whisper models are required, and using these models on CPU is prohibitively slow. Additionally, many developers don't have a GPU (or one with enough memory) to use these models at home.
In this article, you'll learn how to build a free, GPU-powered Whisper API to circumvent these issues so that you can experiment with embedding modern Speech-to-Text in your applications. Below is a chart showing the time it takes for the API to transcribe this sample call on the different runtime types in Colab. You can see that leveraging Colab's free GPUs will save you a huge amount of time when using Whisper.

Let's get started.
#How it works
For this tutorial, we will be using a technique that we leveraged in a previous article on how to build a free Stable Diffusion app. Since Colab allows us to compute with GPUs for free, we will write a Flask API that serves an endpoint for transcription. When we submit an HTTP POST request to this endpoint with a file that we want transcribed, Speech-to-Text is performed on the Colab GPU and then the resulting transcript is sent back to us.
A challenge with this approach lies in actually accessing this API. Colab notebooks run in containers, and we don't have control over the bare metal hardware or the internal network configuration for these servers. This means that we cannot directly access the app.
So we will use ngrok, which acts as a proxy for the application and provides us a public URL to which we can submit requests. Then, we can call the API from a Python script, a frontend application, a terminal, etc. to get a JSON response that contains the transcript of our audio file.
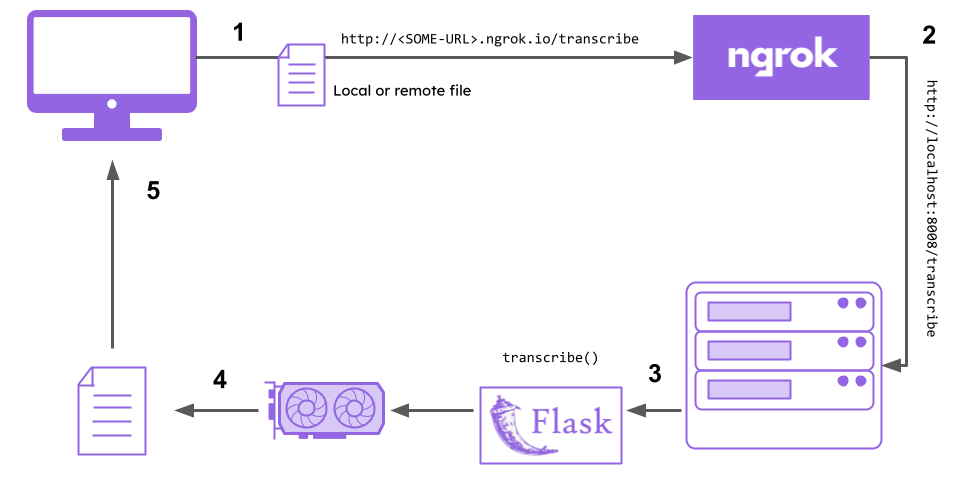
To summarize:
- We submit a file to the ngrok public URL
- ngrok forwards the request to our Flask API
- The
transcribefunction/endpoint in our Flask API executes the transcription - The Speech-to-Text inference is offloaded to the GPU
- The resulting transcript is returned to our computer (via ngrok)
Now that we understand how the API will work, let's start with the initial setup.
#Starting the API
To get started, you will need an ngrok account. You can create one for free here. Once you have created an account, go to the companion Colab notebook and follow the instructions to start your Flask API. All you need to do is paste your ngrok authtoken in the specified cell, and then execute the notebook cells to start your API.
Alternatively, if you want to run the API locally, either for testing with your CPU (the tiny model works quickly enough on CPU) or you have a GPU, you can go to the project GitHub repository and follow the instructions there to do so.
Jump down to the next section on using the API to learn how to use the API to generate transcripts, or jump down to the code explanation to understand how the Flask API works.
#Using the API
After you follow the instructions in the linked Colab or repository README, you will see an output similar to the below image when you run the cell that contains the Flask API:

The URL that contains ngrok is the public URL of your API. To transcribe a file, you need to submit a POST request to the /transcribe endpoint, which you can do in many different ways.
Using cURL
In your terminal, you can use cURL on both Windows and Linux/MacOS to submit such a POST request. Here's how to do so with a remote file - just replace YOUR-NGROK-URL with your ngrok URL and execute the below command in a terminal:
curl -X POST "YOUR-NGROK-URL/transcribe" \
-H "Content-Type: application/json" \
-d '{"file": "https://storage.googleapis.com/aai-web-samples/Custom-Home-Builder.mp3", "model": "large_v2"}'
Alternatively, you can submit a local file. Again, replace YOUR-NGROK-URL with your ngrok URL and /local/file/path.mp3 to the filepath of the file you want to submit:
curl -X POST "YOUR-NGROK-URL/transcribe" \
-H "Content-Type: multipart/form-data" \
-F "file=@/local/file/path.mp3" \
-F "model=large_v2"
Using Python
If you want to use Python, you'll need to install the requests package with pip install requests. Then, you can execute the below script to transcribe a remote file:
import requestsimport os
NGROK_URL = "YOUR-NGROK-URL"
TRANSCRIBE_ENDPOINT = os.path.join(NGROK_URL, "transcribe")
json_data = {'file': "https://storage.googleapis.com/aai-web-samples/Custom-Home-Builder.mp3",
'model': 'large_v2'}
response = requests.post(TRANSCRIBE_ENDPOINT, json=json_data)print(response.json()['transcript'])
Again, make sure to replace YOUR-NGROK-URL with your ngrok URL. Alternatively, you can submit a local file:
import requestsimport os
NGROK_URL = "YOUR-NGROK-URL"
TRANSCRIBE_ENDPOINT = os.path.join(NGROK_URL, "transcribe")with open('/local/file/path.mp3', 'rb') as f:
files = {'file': f}
local_response = requests.post(TRANSCRIBE_ENDPOINT, files=files, data={'model': 'large_v2'})print(local_response.json()['transcript'])
You can try some of the other model sizes too in order to get a feel for the speed-accuracy tradeoff. You can specify any of these model names as the model in the POST request:
tinytiny_enbasebase_ensmallsmall_enmediummedium_enlarge_v1large_v2large_v3largelarge_v3_turboturbo
Check out the next section for an explanation of how the free Whisper API works, or check out some of our other content like this video on how to transcribe live phone calls in real-time:
#Code explanation
Setup
To run the API, we install the following pip packages:
Flask, which provides the framework for building the API (and the development server for serving it)pyngrok, which allows us to open and close ngrok tunnels in Python applicationsopenai-whisper, which provides the Whisper speech-to-text functionality itself
Additionally, we require ffmpeg, which is a highly versatile package for recording, converting, and streaming audio and video.
Finally, you run ngrok authtoken YOUR-AUTHTOKEN-HERE in order to set your ngrok authentication token, which is used to authenticate your requests and associate them with your account.
Imports and ModelNames
Now we move on to examining our Flask application itself. At the top of the corresponding Colab cell (or api.py in the repository), we see the following Python:
from enum import Enumimport osimport timefrom flask import Flask, request, jsonifyfrom pyngrok import ngrokimport requestsimport whisper# Define available Whisper model namesclass ModelNames(str, Enum):
tiny = 'tiny'
tiny_en = 'tiny.en'
base = 'base'
base_en = 'base.en'
small = 'small'
small_en = 'small.en'
medium = 'medium'
medium_en = 'medium.en'
large_v1 = 'large-v1'
large_v2 = 'large-v2'
large_v3 = 'large-v3'
large = 'large'
large_v3_turbo = 'large-v3-turbo'
turbo = 'turbo'
This imports the packages we'll use, and then defines a ModelNames enumeration, which defines a set of permissible Whisper models that can be used while avoiding the pitfalls of specifying this value as a string.
Model loading function
Next, we define the WhisperModels dictionary:
# Store loaded Whisper models
WhisperModels = {k: None for k in ModelNames.__members__}
This dictionary will store the corresponding Whisper model for each model name in the ModelNames enumeration. We initialize the value for each key as None because we don't want to preemptively load every Whisper model. Loading every model would take a long time and eventually error out because we do not have enough GPU RAM to store every single model simultaneously. We want to instead load models when they're needed, and then cache them in the WhisperModels dictionary.
Next, we define a function to load a particular Whisper model:
def load_model(model_name):
"""Function to load the Whisper model, caching it to avoid reloading."""
try:
# Access model value (string) from the enum
if WhisperModels[model_name] is None:
print(f"Loading model {model_name}")
WhisperModels[model_name] = whisper.load_model(ModelNames[model_name].value)
return WhisperModels[model_name], None, None
This function checks to see if we already have the requested model cached, and returns it if so. Otherwise it loads the model, caches it in the dictionary, and then returns the error response and status code which are set to None because of the successful load.
Next, we create an exception for when we try to load a model, but there is not enough memory. In this case, we clear the cache, and then again try to load the model. If it fails again, then we know the issue is not due to a lack of memory and is something else. Therefore, we print out information regarding the issue, and then return the error response and corresponding HTTP status code (along with a None for the model object itself):
except (RuntimeError, MemoryError) as e:
# Catch memory-related errors and reset the loaded models
print(f"Error loading model {model_name}: {e}")
print("Clearing all models to free up memory.")
# Clear all loaded models to free up memory
        WhisperModels.clear()
        WhisperModels.update({k: None
for k in ModelNames.__members__})
# Attempt to load the model again after clearing memory
try:
print(f"Retrying loading model {model_name}")
WhisperModels[model_name] = whisper.load_model(ModelNames[model_name].value)
return WhisperModels[model_name], None, None
except (RuntimeError, MemoryError) as retry_error:
# If it fails again, return a message indicating the memory issue
print(f"Failed to load model {model_name} after memory reset: {retry_error}")
# raise RuntimeError(f"Unable to load the model '{model_name}' due to insufficient memory.") from retry_error
return None, jsonify({'error': f"Unable to load the model '{model_name}' due to insufficient memory."}), 500
File upload function
When a user submits a file for transcription, he can use either a local file or a remote file. Below we have a function to handle file upload in a unified way. First, if a local file is uploaded, the Content-Type is multipart/form-data and the file is specified by file in the uploaded files. In this case, the file is saved to storage on the server where the API is running and the function returns the filepath.
def handle_file_upload(request):
# Handle file in form-data (local file upload)
if 'file' in request.files:
file_input = request.files['file']
if file_input.filename == '':
return None, jsonify({'error': 'No file selected for uploading'}), 400
file_path = os.path.join('temp_audio', file_input.filename)
os.makedirs(os.path.dirname(file_path), exist_ok=True)
file_input.save(file_path)
return file_path, None, None
When a user submits a remote file for transcription, the Content-Type is application/json and the file is specified via the file key of the submitted JSON. In this case, the handling is a little bit more complicated. We check that the file URI starts with the http protocol, and then fetch the audio and write the bytes to a temporary file.
# Handle JSON-encoded remote URL
elif 'file' in request.json and isinstance(request.json['file'], str):
file_input = request.json['file']
if file_input.startswith('http') or file_input.startswith('https'):
try:
response = requests.get(file_input)
response.raise_for_status()
except requests.exceptions.RequestException as e:
return None, jsonify({'error': f'Failed to download file: {e}'}), 400
# Save the downloaded file to a temporary location
            file_path = os.path.join('temp_audio', 'remote_audio.mp3')
            os.makedirs(os.path.dirname(file_path), exist_ok=True)
with open(file_path, 'wb') as f:
f.write(response.content)
return file_path, None, None
else:
return None, jsonify({'error': 'Invalid URL provided'}), 400
else:
return None, jsonify({'error': 'No valid file or URL provided'}), 400
Application startup
Next is the main application that is executed when we run the flask app. We initialize the app by opening an ngrok tunnel on port 8008, and then creating the flask application.
# Initialize ngrok connectionif __name__ == "__main__":
tunnel = ngrok.connect("8008")
print("ngrok connected: ", tunnel.public_url)
# Initialize Flask app
app = Flask(__name__)
Transcription endpoint
Then we define the main transcription endpoint. This function will be executed when we POST to the /transcribe endpoint of our application. First, we check to see if a particular model was specified in the request, and if not, default to the tiny model. Note that specified model names have to be a key in the enumeration, not one of the corresponding string values.
@app.route('/transcribe', methods=['POST'])
def transcribe():
# Check if user passed in a model, or default to `tiny`
if request.is_json and 'model' in request.json:
model_name = request.json.get('model', 'tiny')
else:
model_name = request.form.get('model', 'tiny')
Next, we ensure that the model name is permissible, and then delegate to the load_model function from above to load the model, returning an error if there is one.
# Validate that the model is a valid option
if model_name not in ModelNames.__members__:
return jsonify({'error': f'Invalid model name provided. Valid models are: {list(ModelNames.__members__.keys())}'}), 400
# Load the specified or default model
model, error_response, status_code = load_model(model_name)
if error_response:
return error_response, status_code
Then we handle file upload, delegating to the handle_file_upload function from above.
# Handle file upload (local or remote) via helper function
file_path, error_response, status_code = handle_file_upload(request)
if error_response:
return error_response, status_code
Next, the program performs the actual transcription itself via the model's transcribe method. Additionally, we record the inference time so that we can return it in the response. Also, we remove the temporary audio file saved to disk
# Transcribe the file using the selected model
        start_time = time.time()
        result = model.transcribe(file_path)
        inference_time = time.time() - start_time
# Remove the temporary file
os.remove(file_path)
Finally, we return a JSON response containing the model that was used for the transcription, the transcript itself, and the corresponding inference time.
# Return the transcription
return jsonify({
'model_name': model_name,
'transcript': result['text'],
'inference_time': inference_time # Include the timing data in the response
})
Running the application
Next we add a simple GET endpoint so that we can see that the API is reachable/operational when we run it, and serve the Flask app on port 8008. We run this in a try-except block to ensure that we kill the ngrok tunnel in the case that there is an issue.
Note
# Default route
@app.route('/')
def initial():
return '<p>Hello from your Flask Whisper API!</p>'
# Run the Flask app
try:
app.run(port=8008)
finally:
ngrok.kill()
print('ngrok session terminated')
#Final words
That's how you can leverage Google Colab's GPUs to make a speech-to-text API that isn't prohibitively slow. If you're looking for a simple few-line solution, or something that's more production-ready, check out our docs to get started using our Speech AI models for free.
Otherwise, feel free to check out our YouTube channel or blog to learn more about building with AI and AI theory, like this video on transcribing live phone calls in real-time with Python:
Lorem ipsum dolor sit amet, consectetur adipiscing elit, sed do eiusmod tempor incididunt ut labore et dolore magna aliqua. Ut enim ad minim veniam, quis nostrud exercitation ullamco laboris nisi ut aliquip ex ea commodo consequat. Duis aute irure dolor in reprehenderit in voluptate velit esse cillum dolore eu fugiat nulla pariatur.
Related posts