Build a Discord Voice Bot to Add ChatGPT to Your Voice Channel
Build a sophisticated Discord voice bot that leverages AssemblyAI for speech transcription, OpenAI's GPT-3.5 Turbo AI model for intelligent processing, and ElevenLabs for speech synthesis.


Discord is an instant messaging and social media platform that's a favorite among online communities, streamers, and gamers. One of its most loved features is its voice channels, which allow members to connect over voice and video. Another benefit of Discord, especially for developers, is that it's customizable. You can easily create bots to add functionality or new features to the already great platform.
In this tutorial, you'll see how to create a bot that can integrate with Discord voice channels and interact with users. The bot will be capable of joining voice channels, recording a speaker's audio query, transcribing it to text, feeding it to an AI system to get an intelligent response, and then converting that response back to speech and playing it to the user.
#Set up the bot
You'll build your Discord bot using Node.js and the following third-party services: AssemblyAI for speech-to-text, OpenAI for intelligent responses, and ElevenLabs for text-to-speech conversion. The following diagram illustrates how it will work:

This tutorial assumes you are familiar with JavaScript and Node.js. You should know how to set up a Node.js project, install dependencies, and write basic asynchronous code. Before you get started, make sure you have the following:
Set up a Node.js project
Start by creating a project directory and initializing a Node.js project:
mkdir discord-voice-bot && cd discord-voice-bot
npm init -y
After setting up the project, run the following command to install the required dependencies:
npm install discord.js libsodium-wrappers ffmpeg-static @discordjs/opus @discordjs/voice dotenv assemblyai elevenlabs-node openai
This installs the following Node.js dependencies:
dotenvto manage environment variables like API keysassemblyai, the client library for AssemblyAIelevenlabs-node, the client library for ElevenLabsopenai, the client library for the OpenAI platformdiscord.js,libsodium-wrappers,ffmpeg-static,@discordjs/opus, and@discordjs/voiceto allow integration with Discord and its voice channel functionality
Configure the environment for improved security
To enhance the bot's security, you'll use a .env file to store API keys for the different services you'll be using. To do this, create a file and name it .env. After that, add the following lines as placeholders that will hold your keys:
OPENAI_API_KEY=
ASSEMBLYAI_API_KEY=
ELEVENLABS_API_KEY=
DISCORD_TOKEN=
You'll populate these fields with actual API keys later in the tutorial.
To access these keys in any file, you can easily import them using require('dotenv').config().
Set up Discord and create a basic Discord bot
You'll also need a Discord developer account. Follow the link to create an application and give it an appropriate name. Then, click Bot on the left-hand panel of the application dashboard, navigate to the TOKEN section, and click Reset Token. Save the token to the .env file you created earlier under DISCORD_TOKEN. You'll use this to authenticate with Discord when you log in with your bot.
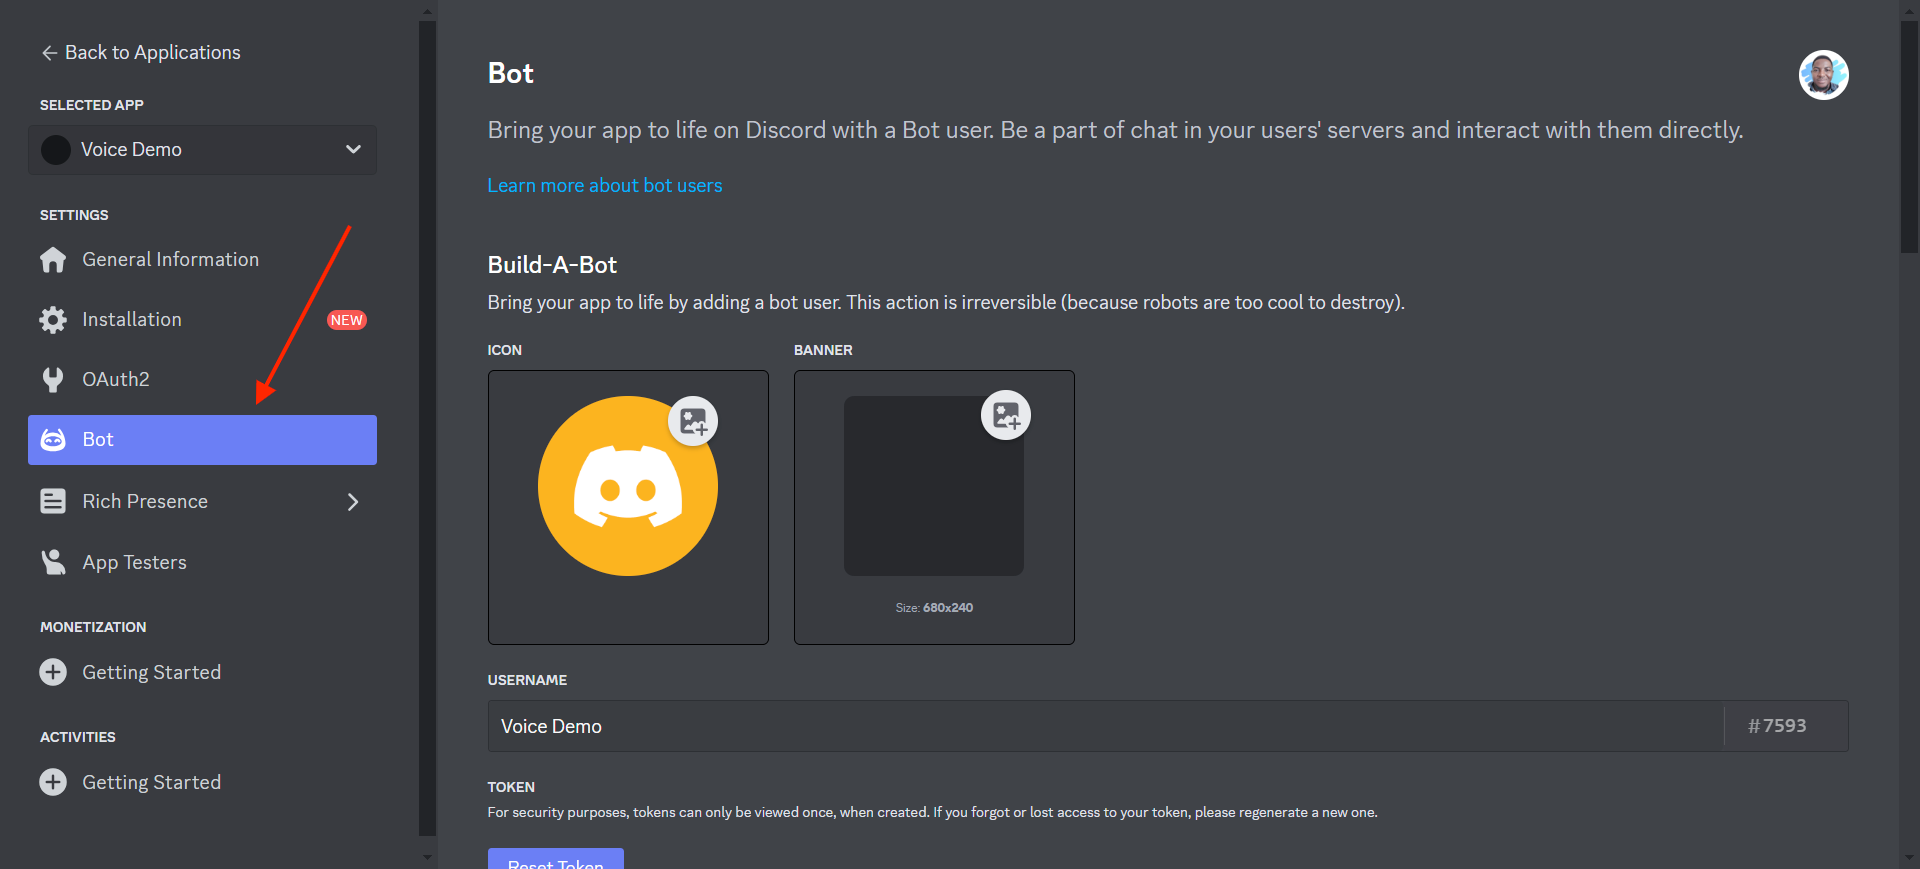
After collecting your token, scroll down on the same page and enable the message content intent under Privileged Gateway Intents. This intent allows you to receive messages and read their contents.
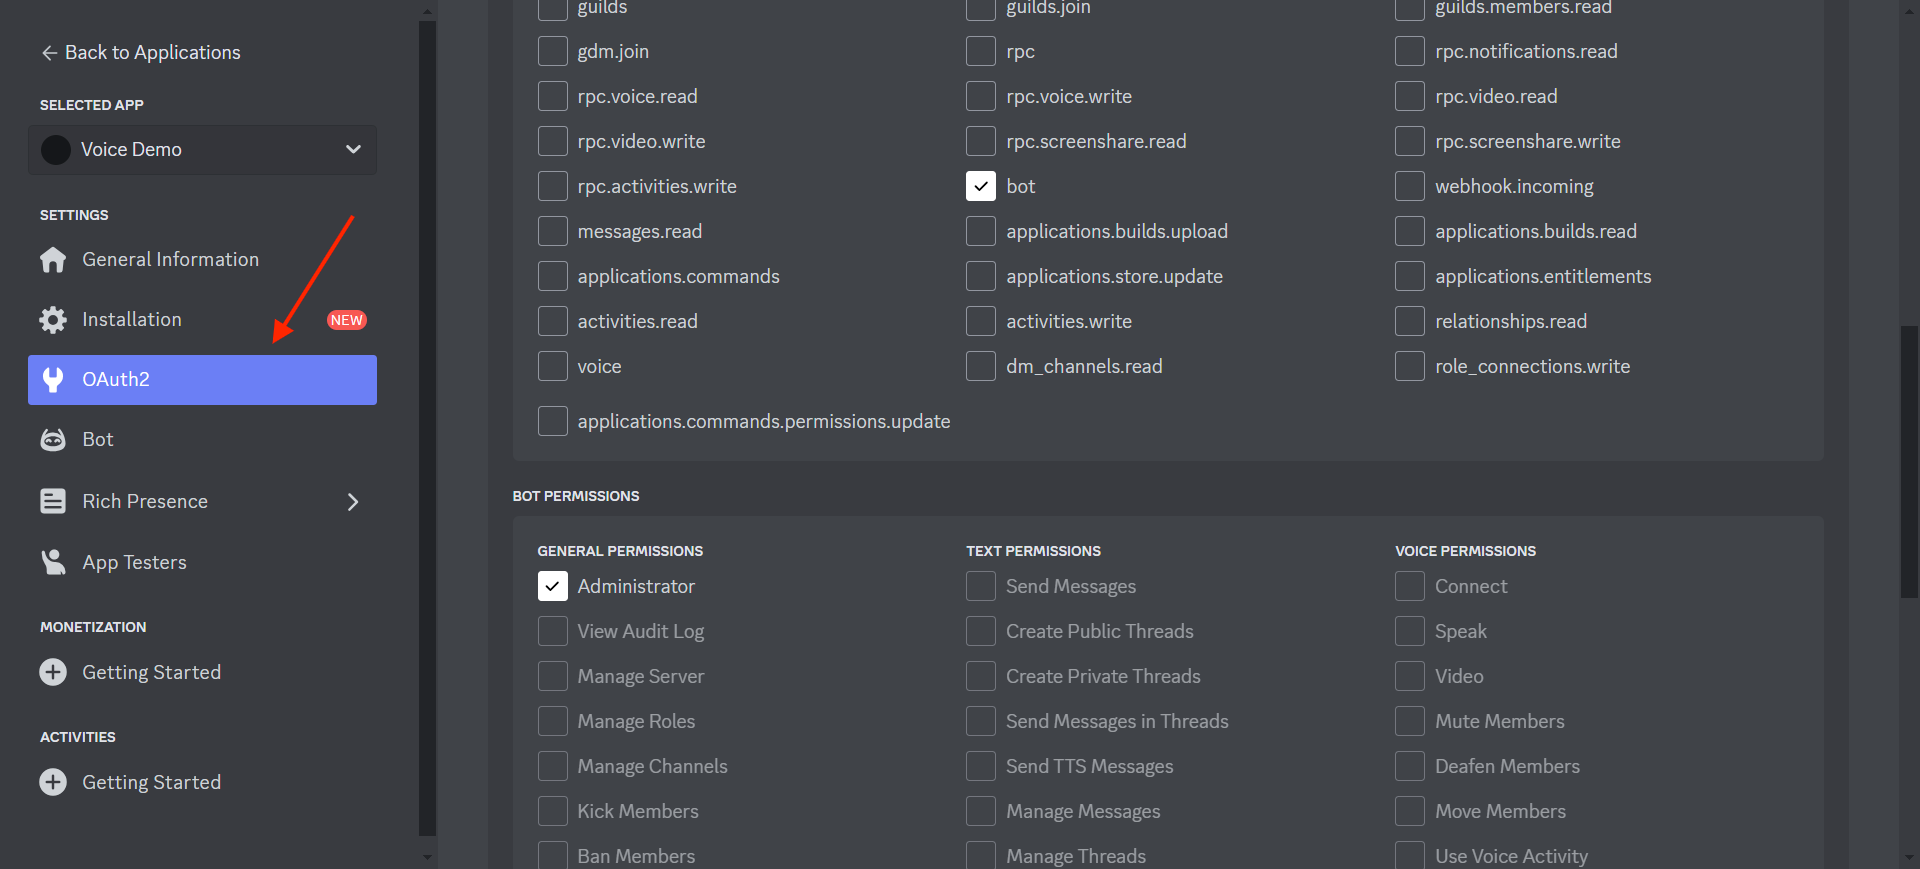
Next, you need to add the bot to your server. Navigate to the OAuth2 tab, then choose the necessary permissions you want the bot to have. For this example, select bot under "Scopes" and Administrator under "Bot Permissions". After that, scroll to the bottom, copy the generated URL, and open it in your browser to add the bot to your server.
Now that you have the token and have added your bot to the server, you can start writing the actual code for the bot. First, create a file named index.js with the following lines to create the basic structure of a Discord bot:
require("dotenv").config();const { GatewayIntentBits } = require("discord-api-types/v10");const { Events, Client } = require("discord.js");const client = new Client({
intents: [
GatewayIntentBits.GuildVoiceStates,
GatewayIntentBits.GuildMessages,
GatewayIntentBits.MessageContent,
GatewayIntentBits.Guilds,
],
});
client.on(Events.ClientReady, () => console.log("Ready!"));
client.on(Events.MessageCreate, async (message) => {
console.log(`New message; ${message.content}`);
});
client.on(Events.Error, console.warn);void client.login(process.env.DISCORD_TOKEN);
The code above, creates a client, passing the intents for the clients. For example, GatewayIntentBits.GuildMessages tells Discord that you want to receive messages from the server. After that, you define the events you want to handle, such as Events.ClientReady, Events.MessageCreate, and Events.Error. Once the event handlers are defined, you can log in to the client, passing the token from earlier.
#Develop the Discord voice bot functions
Now that you have a basic Discord bot set up, it's time to add voice interaction capabilities.
Here's how the bot will work:
- The user will have the option to invite the bot to join a voice channel by sending a message in the text channels.
- Once the bot joins, it will record the user and send the audio to a speech-to-text engine for transcription.
- After receiving this transcription, the text will be fed to OpenAI's ChatGPT API to provide an intelligent response.
- Finally, the response will be converted back to audio to be played back to the user in the voice channel.
Here are the key steps of the bot's process:
- Join a voice channel: The bot uses its
Events.MessageCreatehandler to listen for messages with the specified "join" command. When it receives the command, it joins the voice channel that the sender is connected to. - Record audio: It captures audio from the voice channel using a receiver and writes the raw audio data to a PCM file.
- Transcribe audio: The recorded audio is sent to AssemblyAI for transcription.
- Generate an appropriate response: The transcribed text is used as input for OpenAI's ChatGPT API to generate a relevant response.
- Use text-to-speech conversion: The response from the AI is converted back to audio using ElevenLabs.
- Play a response in the voice channel: The bot then plays the generated audio file in the voice channel.
Join the voice channel
The first step in enabling your Discord bot to interact with voice channels involves listening for a specific command in text channels. This example uses !join as the invocation. Upon receiving this command, the bot will join the voice channel of the user who issued the command. This functionality is pivotal, as it sets the stage for the bot to listen, transcribe, and interact with users through voice.
To make your bot respond to the !join command and enter a voice channel, first replace the existing Events.MessageCreate event handler section in your index.js file with the following code:
const { joinVoiceChannel, VoiceConnectionStatus } = require("@discordjs/voice");
client.on(Events.MessageCreate, async (message) => {
// Check if the message is the join command
if (message.content.toLowerCase() === "!join") {
// Check if user is in a voice channel
channel = message.member.voice.channel;
if (channel) {
const connection = joinVoiceChannel({
channelId: channel.id,
guildId: message.guild.id,
adapterCreator: message.guild.voiceAdapterCreator,
});
const receiver = connection.receiver;
connection.on(VoiceConnectionStatus.Ready, () => {
message.reply(`Joined voice channel: ${channel.name}!`);
// Call a function that handles listening and responding to the user
listenAndRespond(connection, receiver, message);
});
} else {
message.reply("You need to join a voice channel first!");
}
  }
});
When the bot receives a message, it checks if the content matches !join. If the command is detected, the bot verifies that the user is in a voice channel. If not, it sends a reply urging the user to join one. If the user is in a voice channel, the bot uses the joinVoiceChannel method to connect to the same channel. This method requires the channel ID, guild (server) ID, and voice adapter creator; these values can be extracted from the user message. The bot then sends a message to the text channel, confirming it has joined the voice channel. Lastly, the bot calls a listenAndRespond function that you'll implement in the next section and handles listening to the conversation and responding.
Record and transcribe the audio
As the bot needs to interact with users through voice channels, it must be able to capture voice input from Discord users. The bot needs to record audio streams from these channels, which can later be transcribed into text using AssemblyAI. Recording starts once the bot joins a voice channel, as described in the previous section. The bot will capture raw audio data, which Discord delivers in an Opus-encoded stream.
Here's how to create an audio stream that captures everything the speaker says:
const {
createAudioResource,
StreamType,
AudioPlayerStatus,
createAudioPlayer,
EndBehaviorType,
} = require("@discordjs/voice");async function listenAndRespond(connection, receiver, message) {
const audioStream = receiver.subscribe(message.author.id, {
end: {
behavior: EndBehaviorType.AfterSilence,
duration: 1000,
},
});
}
This code snippet introduces a listenAndRespond function that's designed to be called once a relevant message (such as !join) triggers the bot to join a voice channel. Upon joining, the bot uses a receiver to subscribe to audio streams from the voice channel. The bot receiver collects the user's audio stream while they are speaking, and EndBehaviorType.AfterSilence terminates the subscription once the user is silent.
Streaming Speech-to-Text with AssemblyAI
After successfully capturing the user's audio stream, the next step is transcribing this audio into text. AssemblyAI's real-time API enables you to transcribe audio as it's being spoken, delivering a more fluid and interactive experience.
To get started with AssemblyAI, you can visit its website and obtain an API key from the developer dashboard. This key will allow you to interact with the API. Once you have it, save it to the .env file you created earlier under ASSEMBLYAI_API_KEY.
With the key configured, you can initialize an AssemblyAI client and create a real-time transcriber:
const { AssemblyAI } = require("assemblyai");const assemblyAI = new AssemblyAI({ apiKey: process.env.ASSEMBLYAI_API_KEY });// Set up the real-time transcriberconst transcriber = assemblyAI.realtime.transcriber({
sampleRate: 48000, // Match the sample rate used in Discord audio
});
The code above sets up an AssemblyAI client with your API key and creates a transcriber object specifically for streaming speech-to-text. The sampleRate should match the sample rate of the audio stream from Discord, which is typically 48,000 Hz.
The transcriber object exposes different events to which you can respond. These include the following:
open: This event triggers when the real-time session is successfully established with AssemblyAI.error: This event occurs if any errors arise during the transcription process.close: This event signals the end of the real-time session, which might happen due to various reasons, such as the user stopping speaking or an error occurring.transcript: This event provides streaming speech-to-text results as the audio is processed. The transcript object contains the transcribed text and information about whether it's aFinalTranscript(complete sentence or utterance) or aPartialTranscript(ongoing transcription).
The following code shows how to use these events to transcribe audio using AssemblyAI. Append it to the listenAndRespond function:
transcriber.on("open", ({ sessionId }) => {
console.log(`Real-time session opened with ID: ${sessionId}`);
});
transcriber.on("error", (error) => {
console.error("Real-time transcription error:", error);
});
transcriber.on("close", (code, reason) => {
console.log("Real-time session closed:", code, reason);
// Process the final accumulated transcript here
});var transcription = "";
transcriber.on("transcript", (transcript) => {
if (transcript.message_type === "FinalTranscript") {
console.log("Final:", transcript.text);
transcription += transcript.text + " "; // Append to the full message
}
});// Connect to the real-time transcription serviceawait transcriber.connect();
Note: It's important to understand that FinalTranscript signifies the completion of a sentence or utterance, not necessarily the end of the entire recording. You must keep appending the received text to build the full message until the session closes (eg due to silence timeout).
Feed audio to AssemblyAI
To transcribe the user's speech in real time, you have to feed the audio stream from Discord to the AssemblyAI transcriber. Add the following code to the end of the listenAndRespond function:
const prism = require("prism-media");const opusDecoder = new prism.opus.Decoder({ rate: 48000, channels: 1 });// Pipe the decoded audio chunks to AssemblyAI for transcription
audioStream.pipe(opusDecoder).on("data", (chunk) => {
transcriber.sendAudio(chunk);
});// Handle disconnection
audioStream.on("end", async () => {
await transcriber.close();
console.log("Final text:", transcription);
// Start producing a response
});
The code above uses the prism-media library to decode the Opus audio stream into a format suitable for AssemblyAI. Then, for each decoded audio chunk received, it calls transcriber.sendAudio(chunk) to send it to AssemblyAI for streaming speech-to-text.
When the end event is emitted, it means the user has stopped speaking (ie after one second of silence). When this occurs, the transcriber.close function is called, closing the real-time transcription. At this point, you can then use the transcribed text to generate and respond with an intelligent reply.
Process text with ChatGPT
After transcribing voice input into text with AssemblyAI, the next step is to generate an intelligent response. To do this, you'll use OpenAI's advanced AI models to understand user queries and craft appropriate replies.
Go ahead and create an OpenAI account if you don't already have one. After doing so, retrieve your API key and add it to your .env file under OPENAI_API_KEY.
Add the following code to integrate ChatGPT into your Discord bot:
const { OpenAI } = require("openai");// Initialize OpenAI Clientconst openai = new OpenAI({ apiKey: process.env.OPENAI_API_KEY });async function getChatGPTResponse(text) {
try {
const response = await openai.completions.create({
model: "gpt-3.5-turbo-instruct-0914",
prompt: text,
max_tokens: 100,
});
return response.choices[0].text.trim();
} catch (error) {
console.error("Error with ChatGPT:", error);
return "I am having trouble processing this right now.";
}
}
The code above creates an OpenAI client that queries the gpt-3.5-turbo AI model using the openai.completions.create method. The response contains the LLM's response to the user's query.
Add voice with ElevenLabs
The final piece of the puzzle involves converting the text responses generated by ChatGPT back into speech. This is achieved through ElevenLabs's text-to-speech (TTS) technology. Start by obtaining an ElevenLabs API key, which you'll use to access the TTS service. Make sure to add it to your .env file under ELEVENLABS_API_KEY.
To convert ChatGPT's text responses into audible speech, use the following code:
const ElevenLabs = require("elevenlabs-node");// Initialize ElevenLabs Clientconst voice = new ElevenLabs({
apiKey: process.env.ELEVENLABS_API_KEY,
});async function convertTextToSpeech(text) {
const fileName = `${Date.now()}.mp3`;
try {
const response = await voice.textToSpeech({ fileName, textInput: text });
return response.status === "ok" ? fileName : null;
} catch (error) {
console.error("Error with text-to-speech conversion:", error);
return null;
}
}
In this snippet, the convertTextToSpeech function takes the text response from ChatGPT and sends it to ElevenLabs. ElevenLabs then returns an audio file named with the current timestamp to ensure uniqueness. This audio file is then ready to be played to the user on Discord, providing a seamless voice interaction experience.
#Put It All Together
Now that you have all the building blocks of the bot, it's time to put them all together. Once you get the audio file from ElevenLabs, you just need to play it back to the user. This and the rest of the process—audio transcription, response process, and audio generation—are shown in the snippet below:
audioStream.on("end", async () => {
// Close the transcriber
await transcriber.close();
console.log("Final text:", transcription);
const chatGPTResponse = await getChatGPTResponse(transcription);
console.log("ChatGPT response:", chatGPTResponse);
const audioPath = await convertTextToSpeech(chatGPTResponse);
const audioResource = createAudioResource(audioPath, {
inputType: StreamType.Arbitrary,
});
const player = createAudioPlayer();
player.play(audioResource);
connection.subscribe(player);
player.on(AudioPlayerStatus.Idle, () => {
console.log("Finished playing audio response.");
player.stop();
// Listen for the next user query
listenAndRespond(connection, receiver, message);
});
});
The additional code for playing audio works by creating an audio resource from the generated speech file. Then, an audio player is set up and instructed to play this resource. The bot's voice connection is subscribed to the audio player, ensuring the audio is played in the correct voice channel. Finally, the code waits for the audio playback to finish and then prepares the bot to listen for the next user query. This way, the user can keep asking questions in the voice channel.
You can run the code using node index.js. Below is the sample output you get when you run the script and interact with the Discord bot:
The complete code for this tutorial can be found here.
#Conclusion
This tutorial explained how to build a sophisticated Discord voice bot that leverages AssemblyAI for speech transcription, OpenAI's GPT-3.5 Turbo AI model for intelligent processing, and ElevenLabs for speech synthesis. This project not only highlights the capabilities of modern AI and voice technologies but also opens up a realm of possibilities for creating more interactive, accessible, and engaging applications.
To learn more about AI and voice technology, explore AssemblyAI, a pioneering Voice AI company at the forefront of speech recognition. AssemblyAI provides user-friendly, rapid, and cost-effective Voice AI models proficient in transcription, speaker detection, sentiment analysis, and a host of other functionalities.
Lorem ipsum dolor sit amet, consectetur adipiscing elit, sed do eiusmod tempor incididunt ut labore et dolore magna aliqua. Ut enim ad minim veniam, quis nostrud exercitation ullamco laboris nisi ut aliquip ex ea commodo consequat. Duis aute irure dolor in reprehenderit in voluptate velit esse cillum dolore eu fugiat nulla pariatur.